
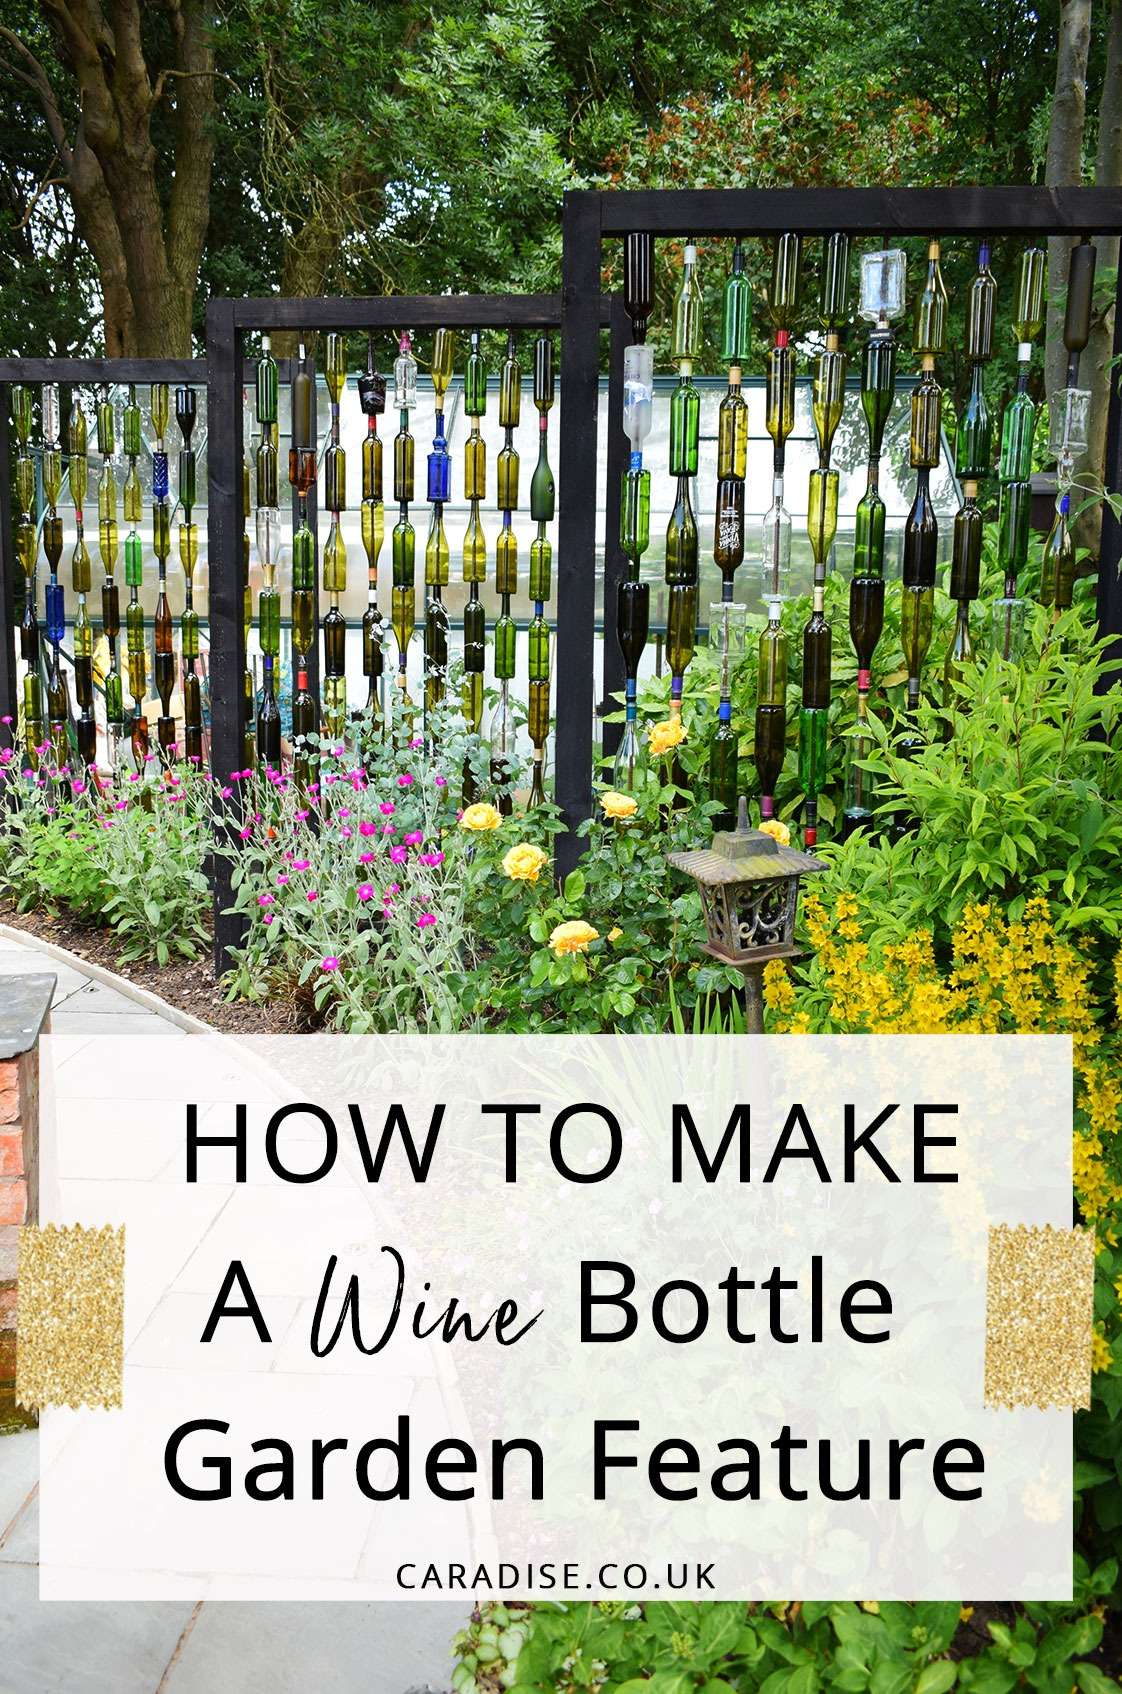
In my garden makeover post from last year, I gave a little sneak peak of the wine bottle screen we had started. As soon as spring arrived we were out in the garden to finish it and I’ve finally gotten round to putting together this post. Our creation has been quite a talking point amongst our family and friends and I have to say has impressed visitors.
The idea behind the screen was to hide our 12ft greenhouse (that we bought off eBay last year), whilst letting in light at the same time. It was also great to use recycled materials. If you want to have a go at making your own, or just want to see how it turned out, then read on for how to make a wine bottle screen for your garden.
One more thing before you scroll! Did you know I also have a podcast where you can learn how to confidently decorate your home with bold interior design. Listen now to the Daring Home Decor Podcast for tons of FREE design content.
(I’ve included some affiliate links in this post, shown with an asterisk (*). If you click on them and make a purchase, I get a bit of money in my back pocket, to help towards future creations to share with you on my blog.)
Items You Will Need:-
We used 80 wine bottles per screen, so 240 in total. I do drink wine, but it would have taken me quite a while to get through that many bottles so donations from family, friends, and our local pub were most welcome. One thing is for certain, I do not miss soaking labels from bottles! I’m sure some of them were stuck on with superglue!!
MATERIALS PER SCREEN:
- 80 x wine bottles or any bottles of your choice
- 3 x *incised posts 100mm x 100mm x 3m
- 10 x *rebar 12mm x 3m
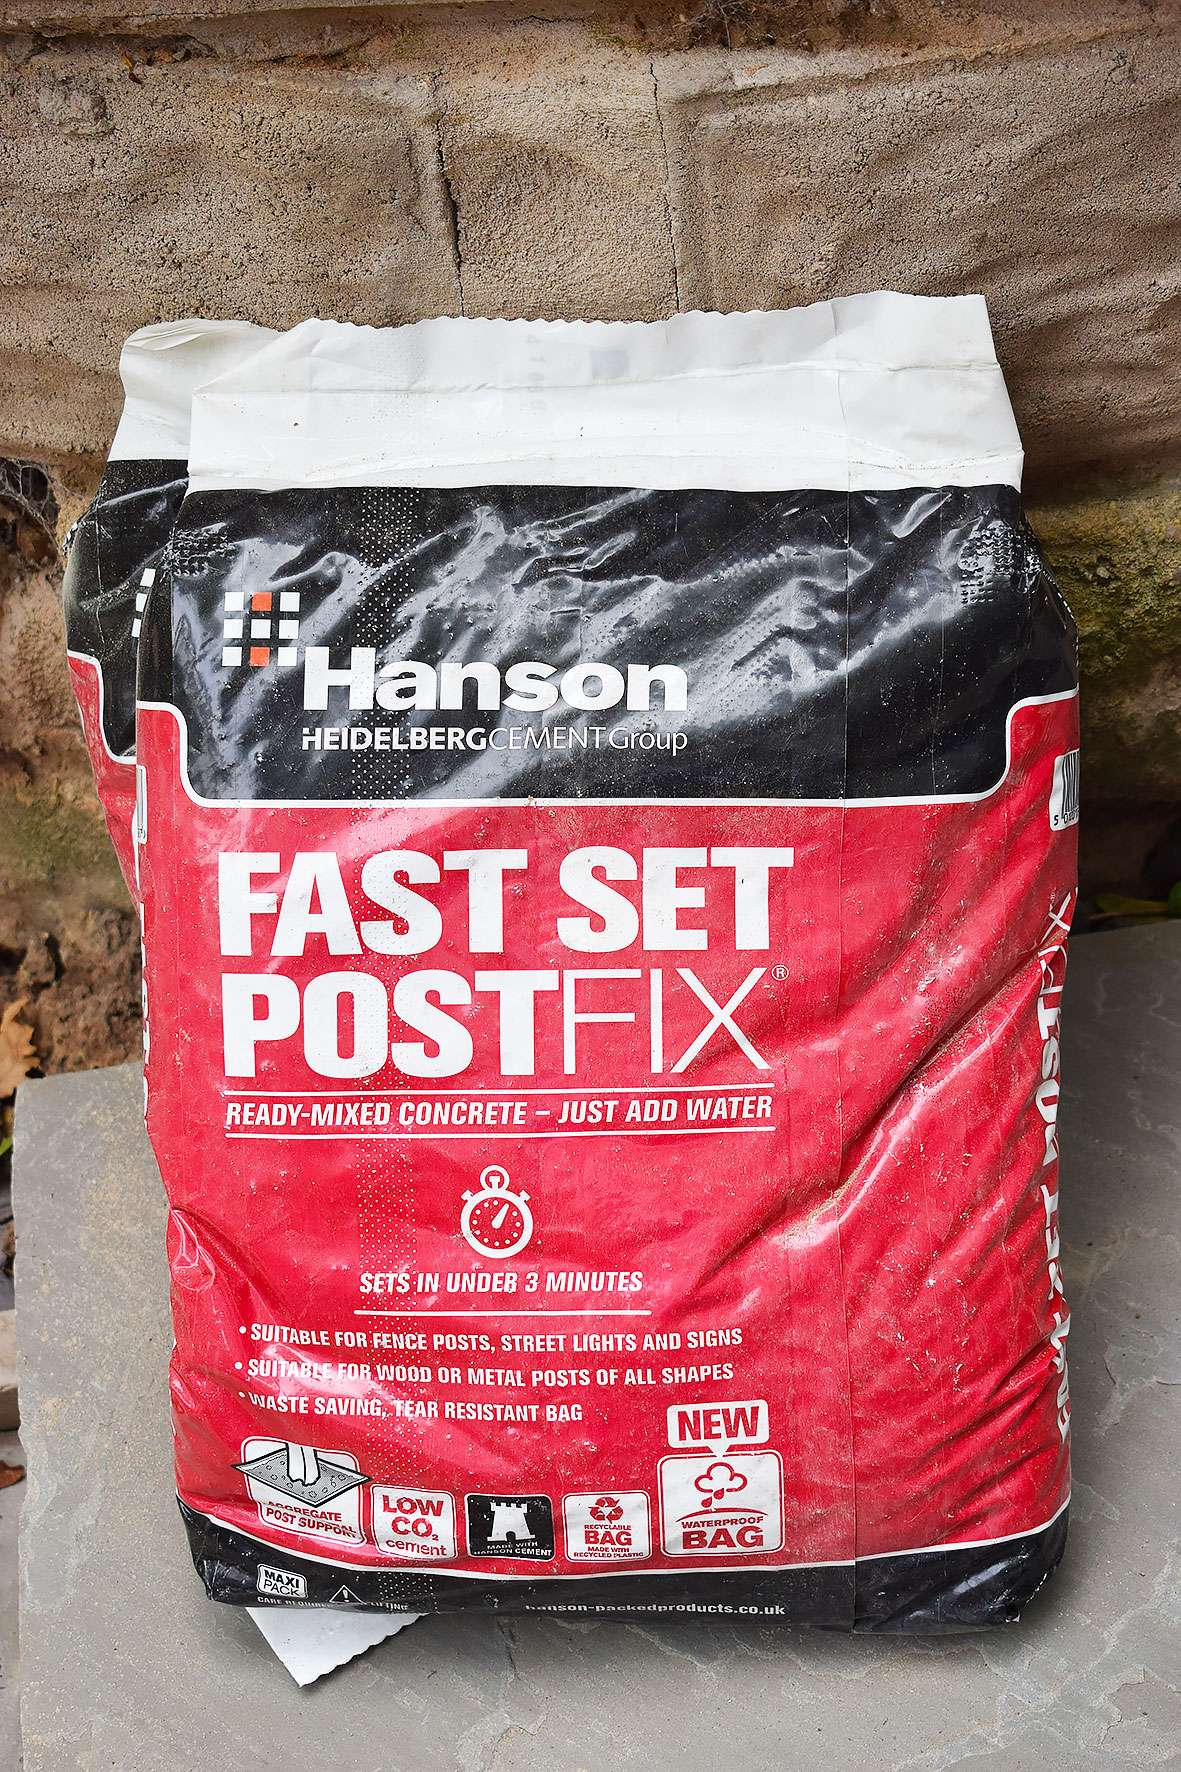
- 2 x *fast set postfix
- fence paint
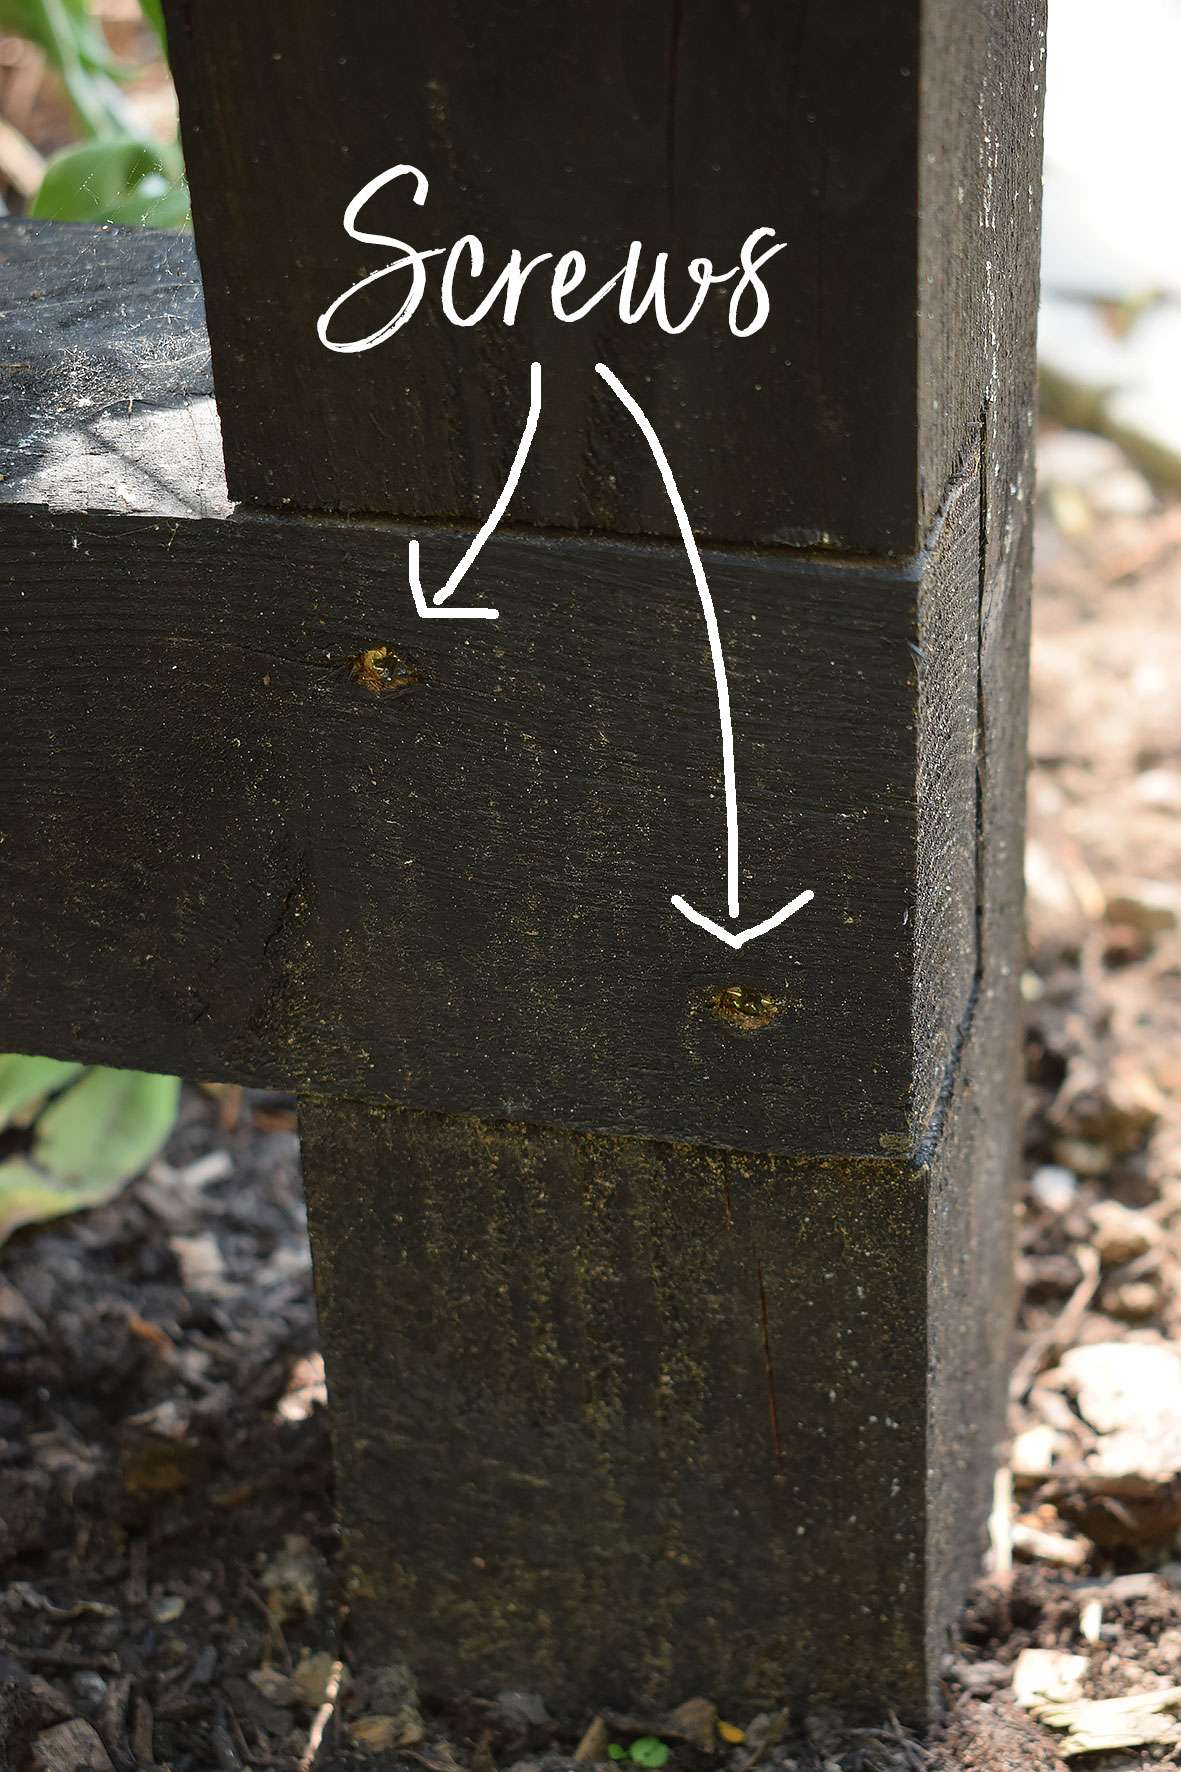
- 8 x 80mm screws
TOOLS & EQUIPMENT:
- hammer
- chisel
- drill & 12mm drill bit
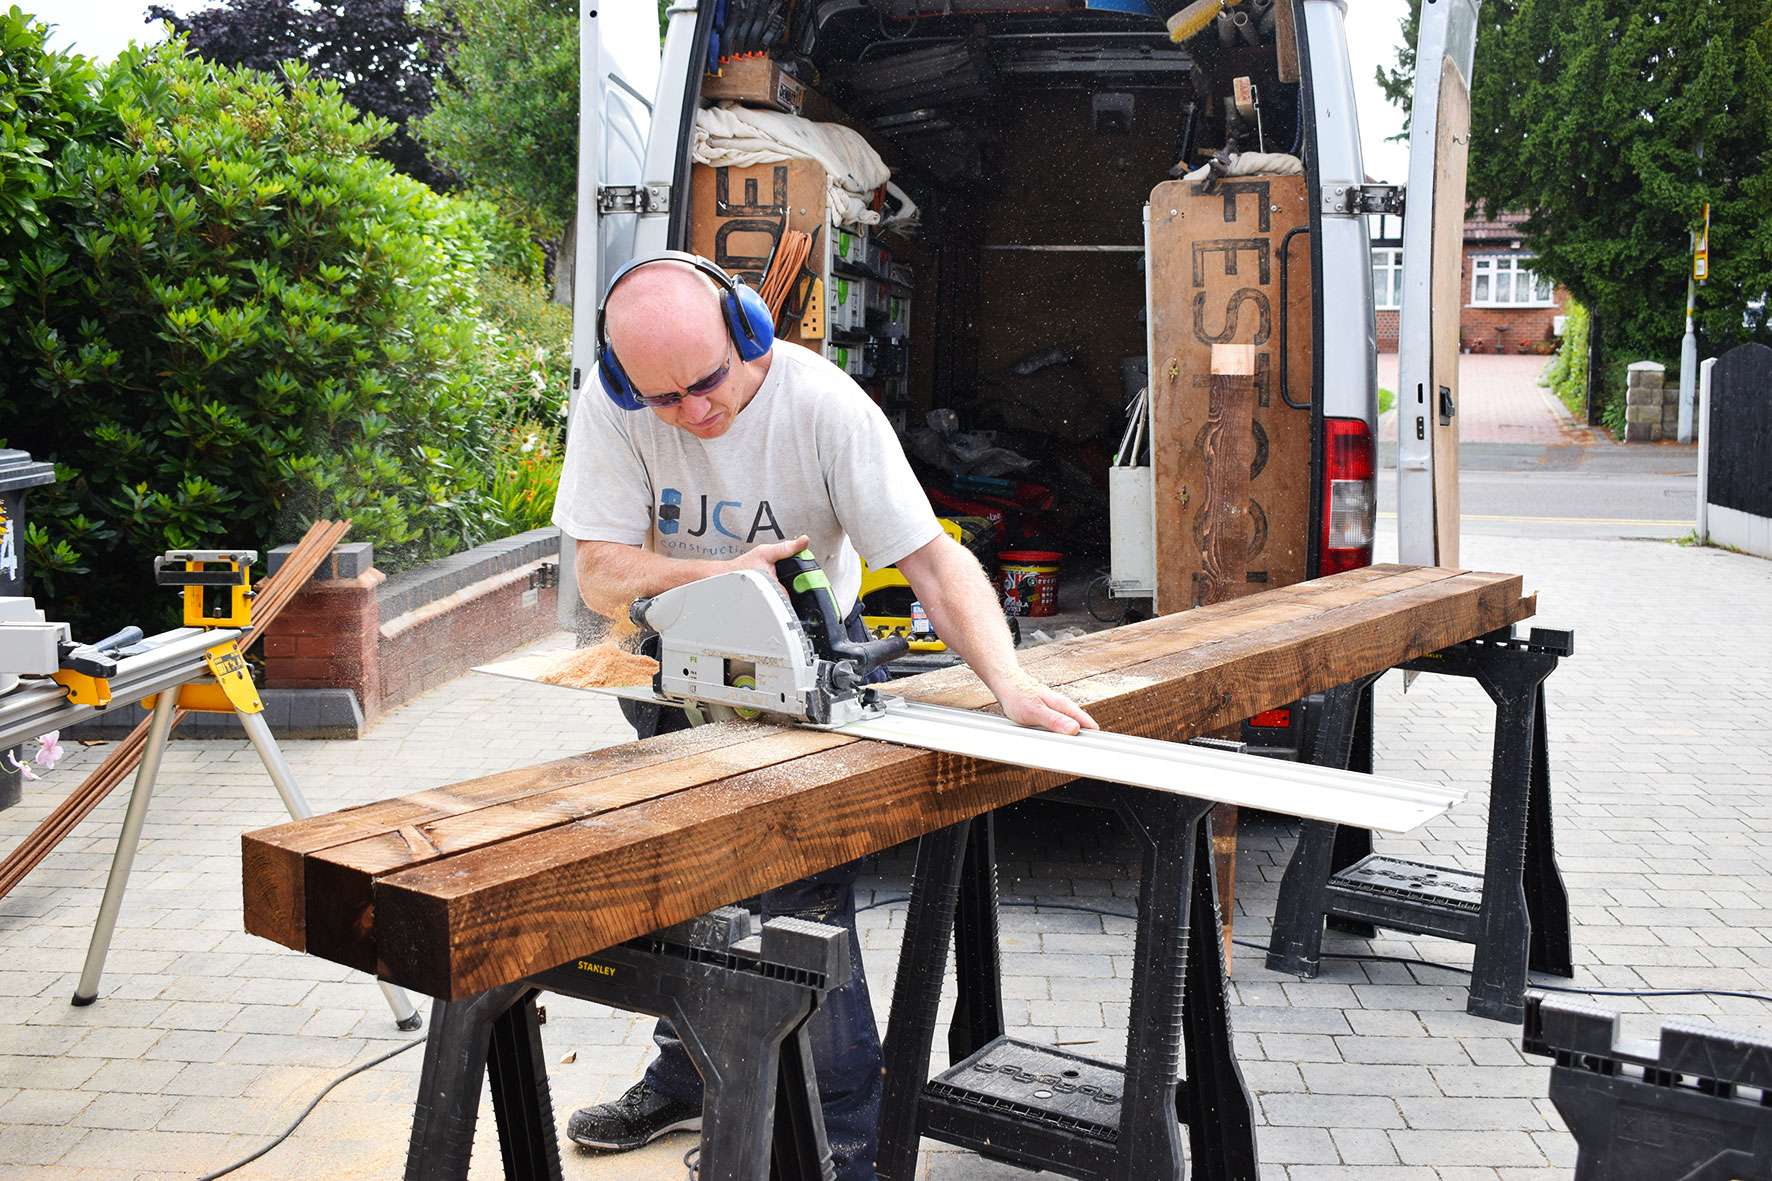
- plunge saw or hand saw
- chop saw or hand saw
- goggles & ear defenders (if using power tools)
- tape measure & pencil
- spirit level
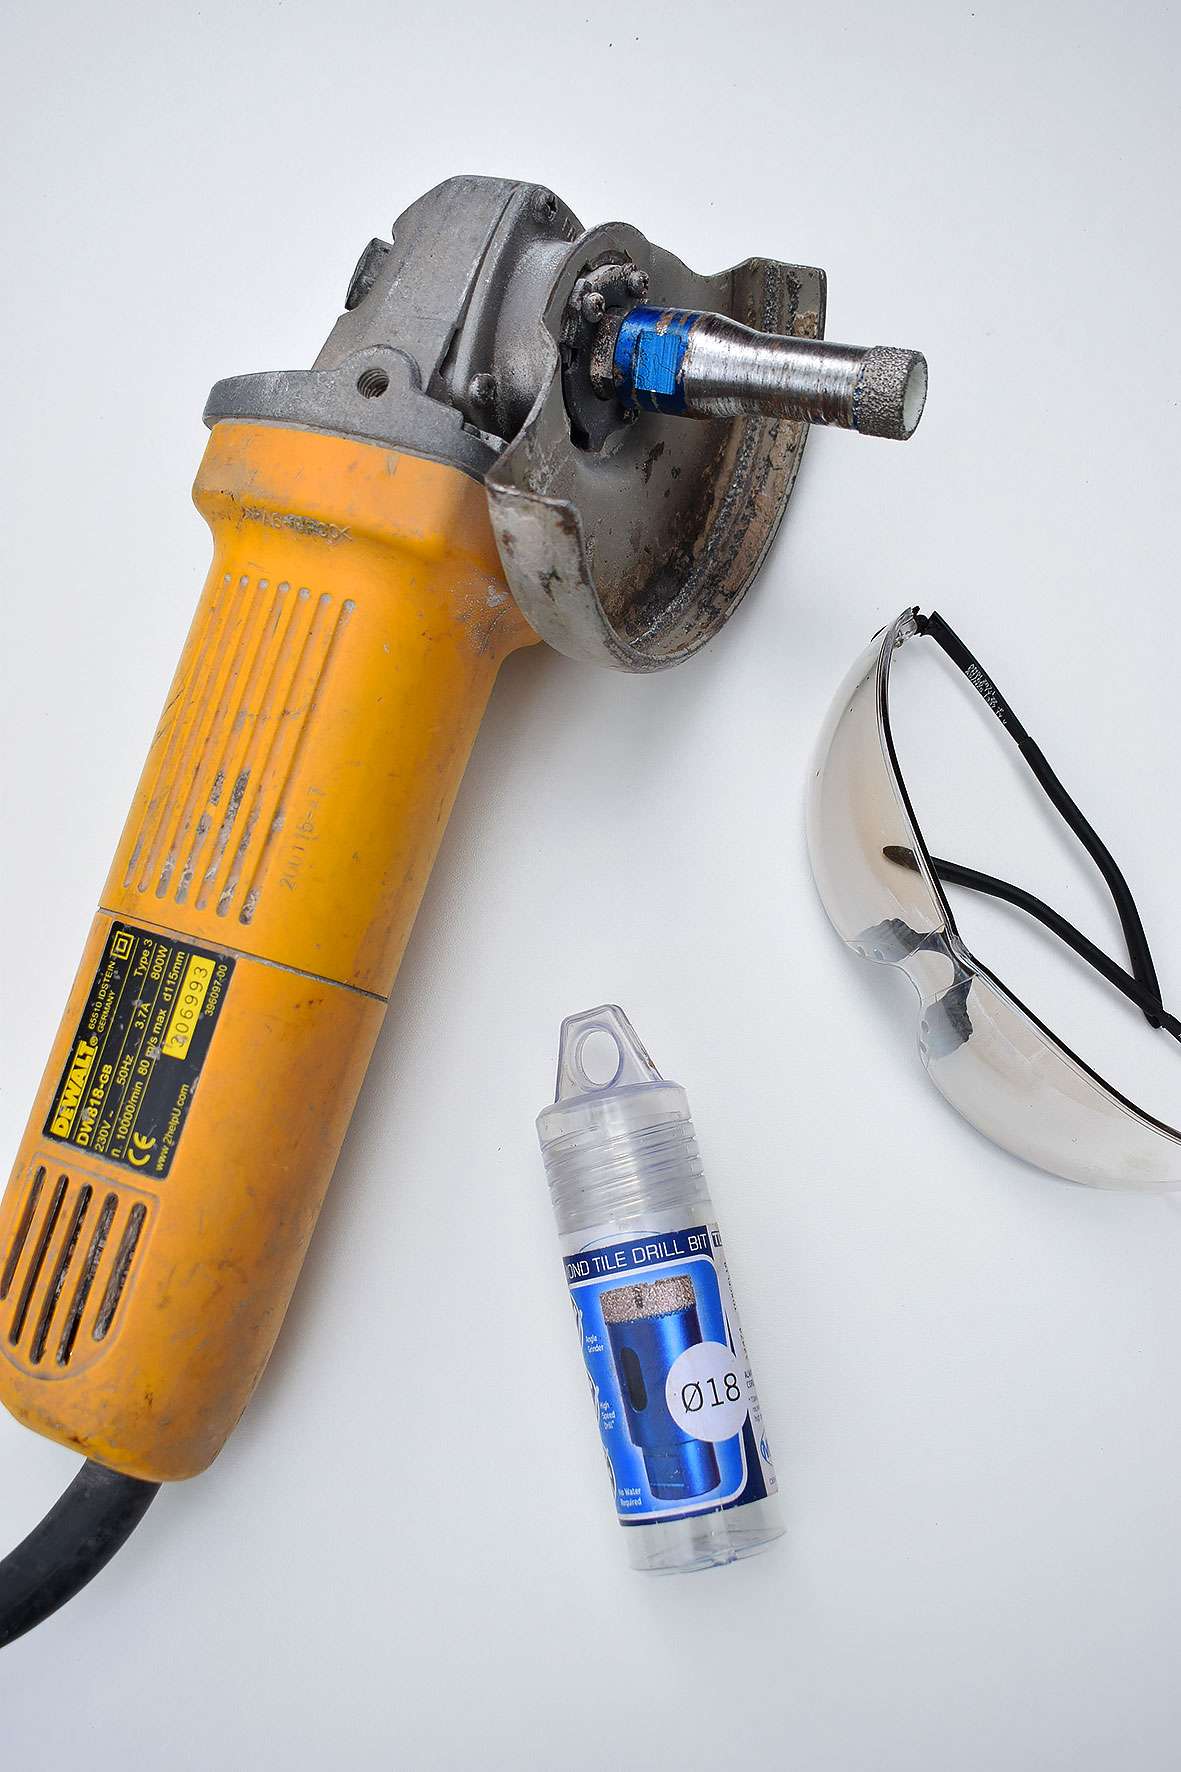
- 115mm Angle grinder
- *Mexco TDXCEL Vacuum Brazed diamond drill bit 18mm
- G-clamp x 2
- Lump hammer
- goggles
- gloves
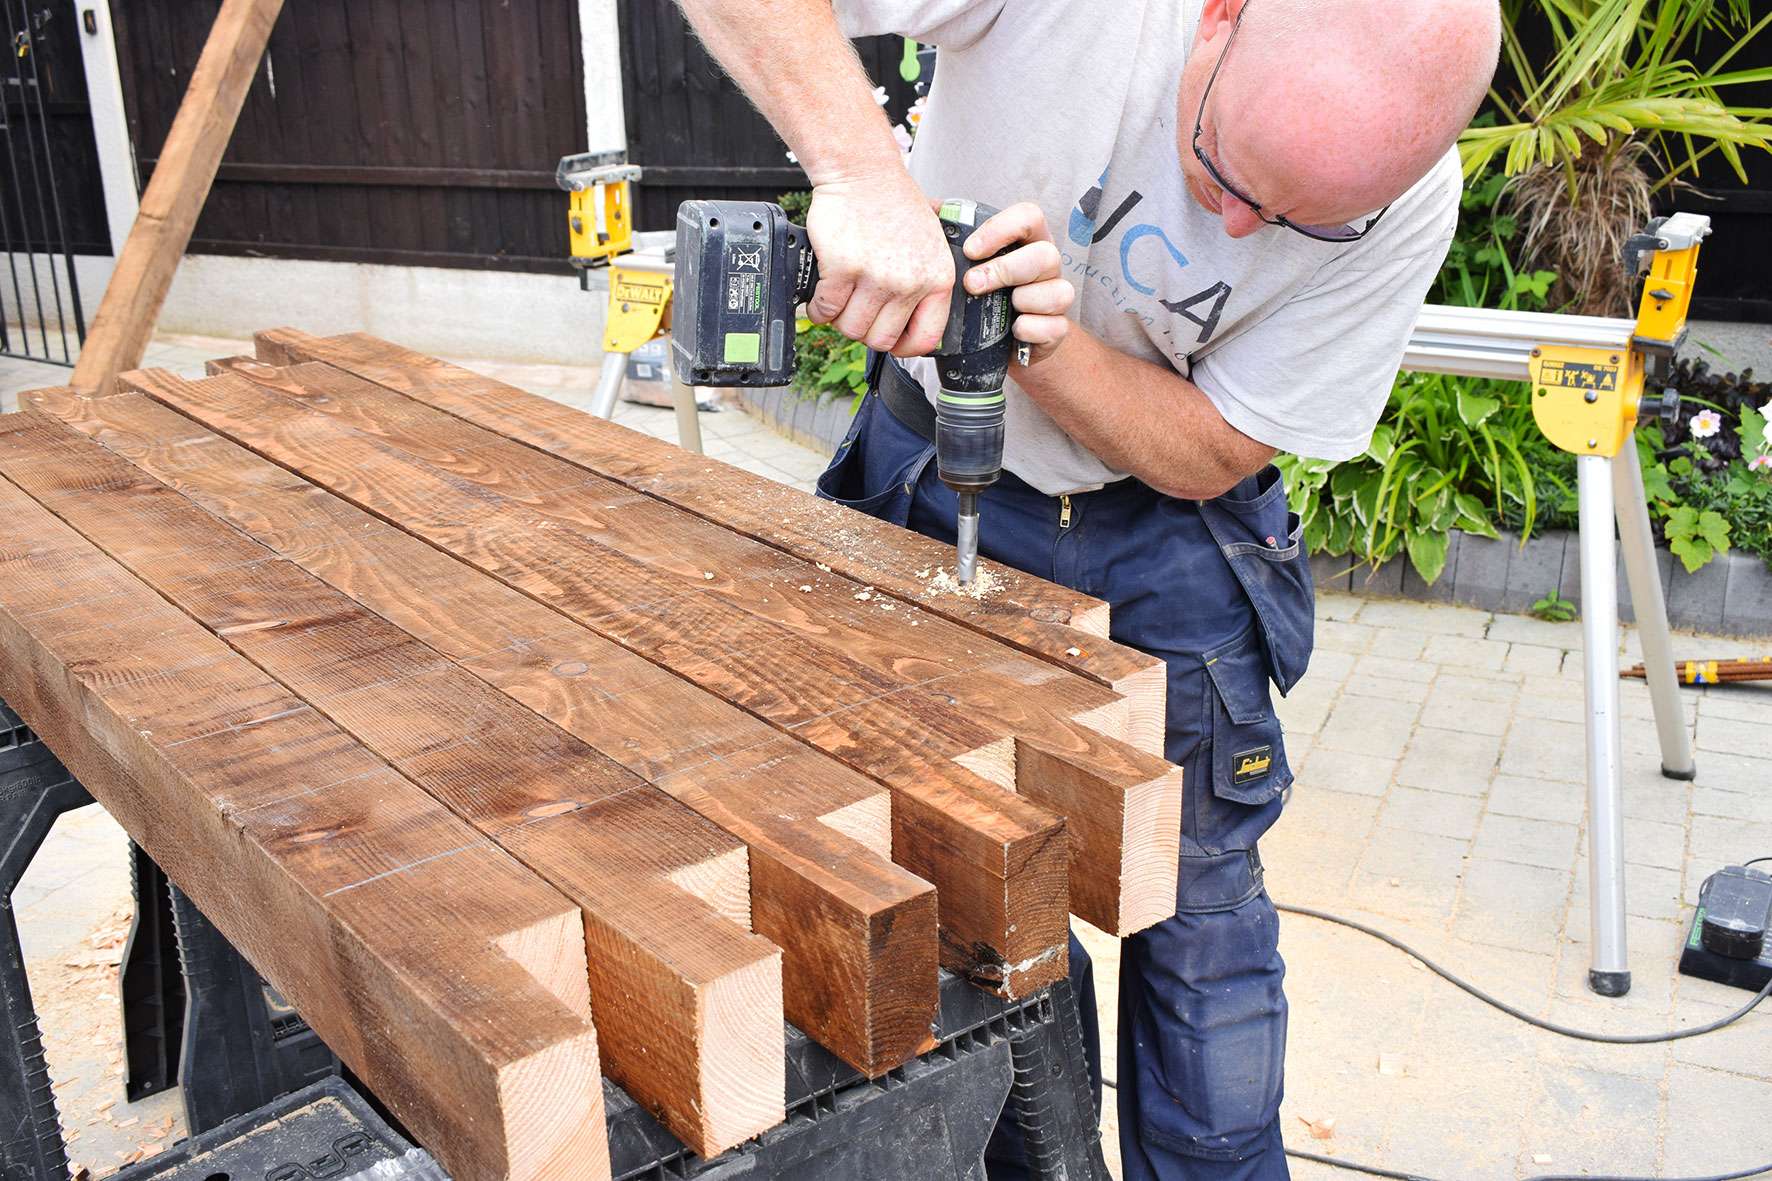
As you will see, Andy is the star of the show here. And rightly so, as he did most of the work! (although I did soak the labels off 240 bottles. Did I mention that?).
Step – How To Make A Wine Bottle Screen
The instructions given will be per screen. In the pictures you may see more materials being prepared, as we made 3 screens in total.
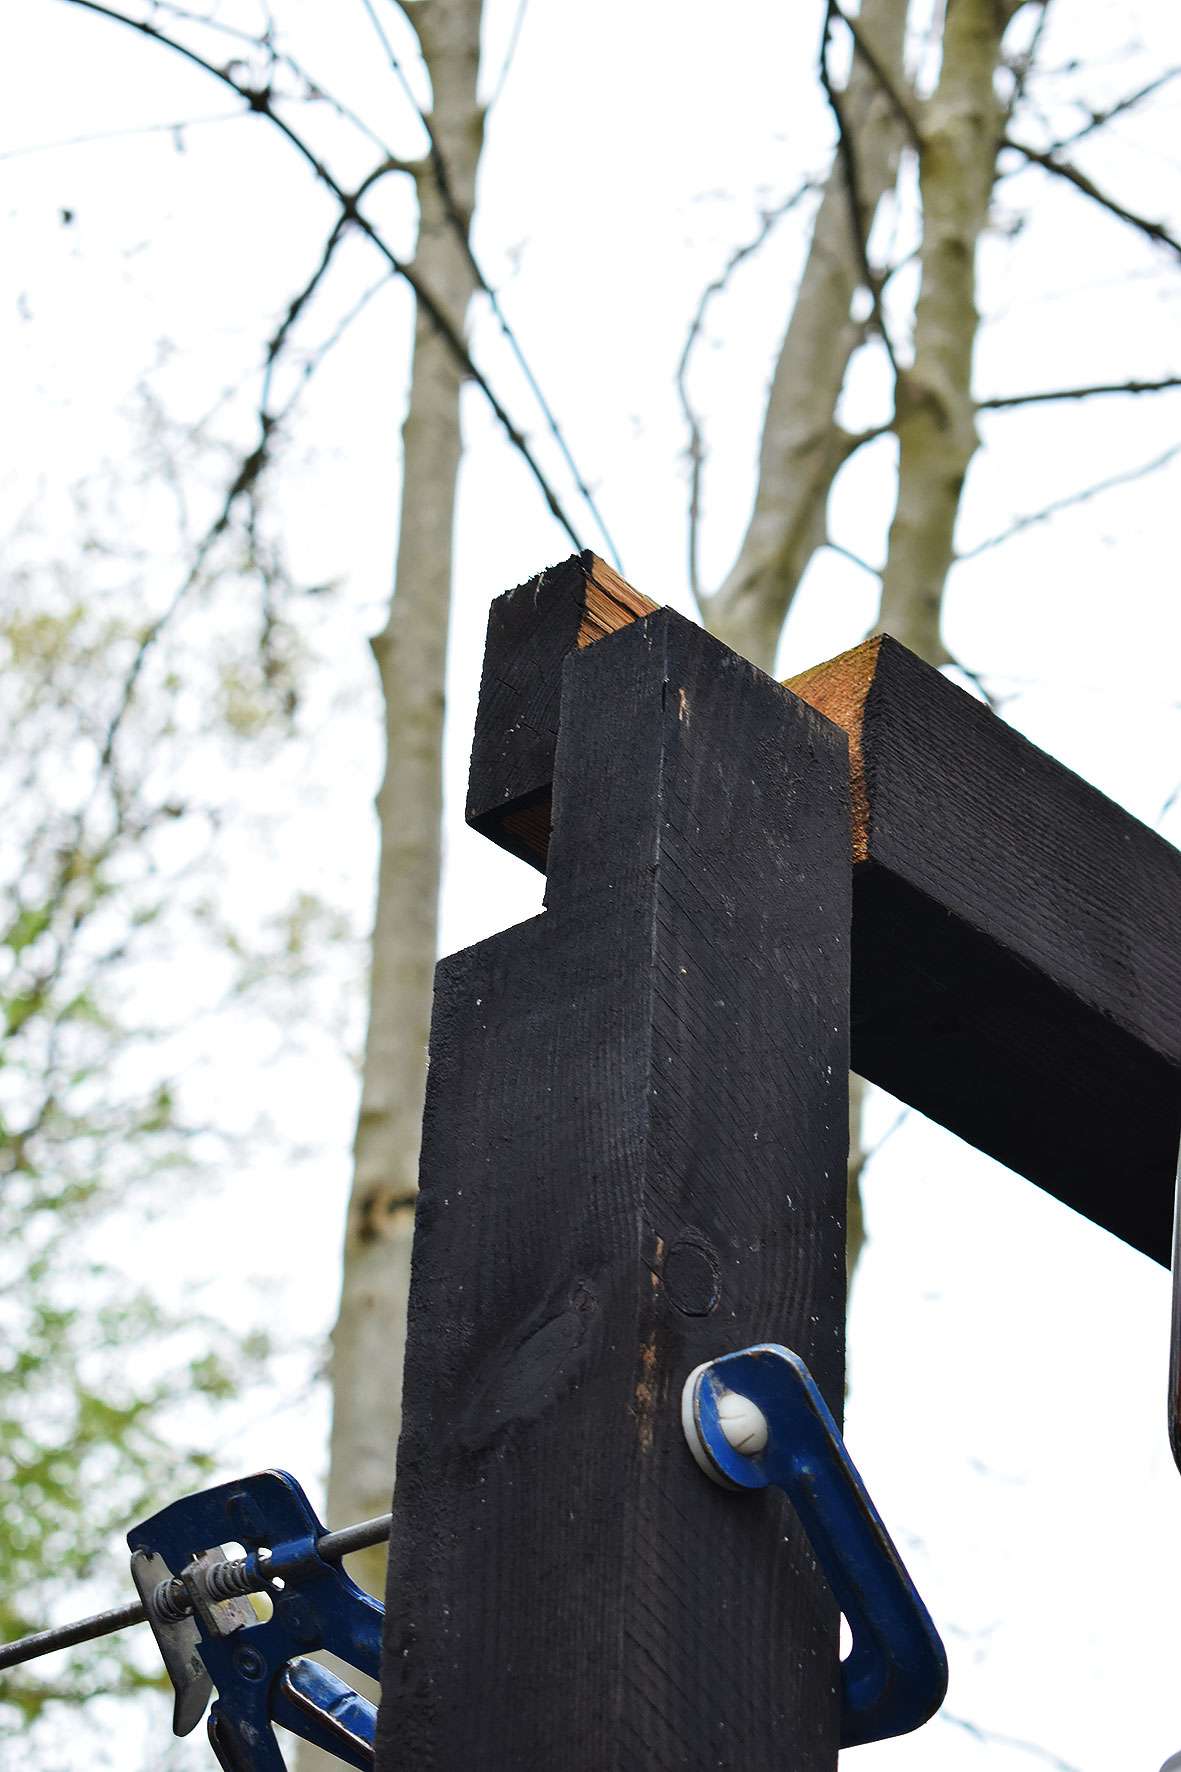
Measure along to 2280mm of 2 of the 3m incised posts and mark with a pencil.
On the one end of each of the 2 posts, make saw cuts over a 100mm x 100mm area using a plunge saw with a guide rail (or hand saw) to prepare for making housing joints. Repeat the saw cuts again from your measured mark inwards so the length in total from the inner edge of housing joint to housing joint will be 2080mm (see 3 pics down for measurement illustration).
You can see the saw cuts below the guide rail in the picture below.
Chisel out the saw cuts to make your housing joints.
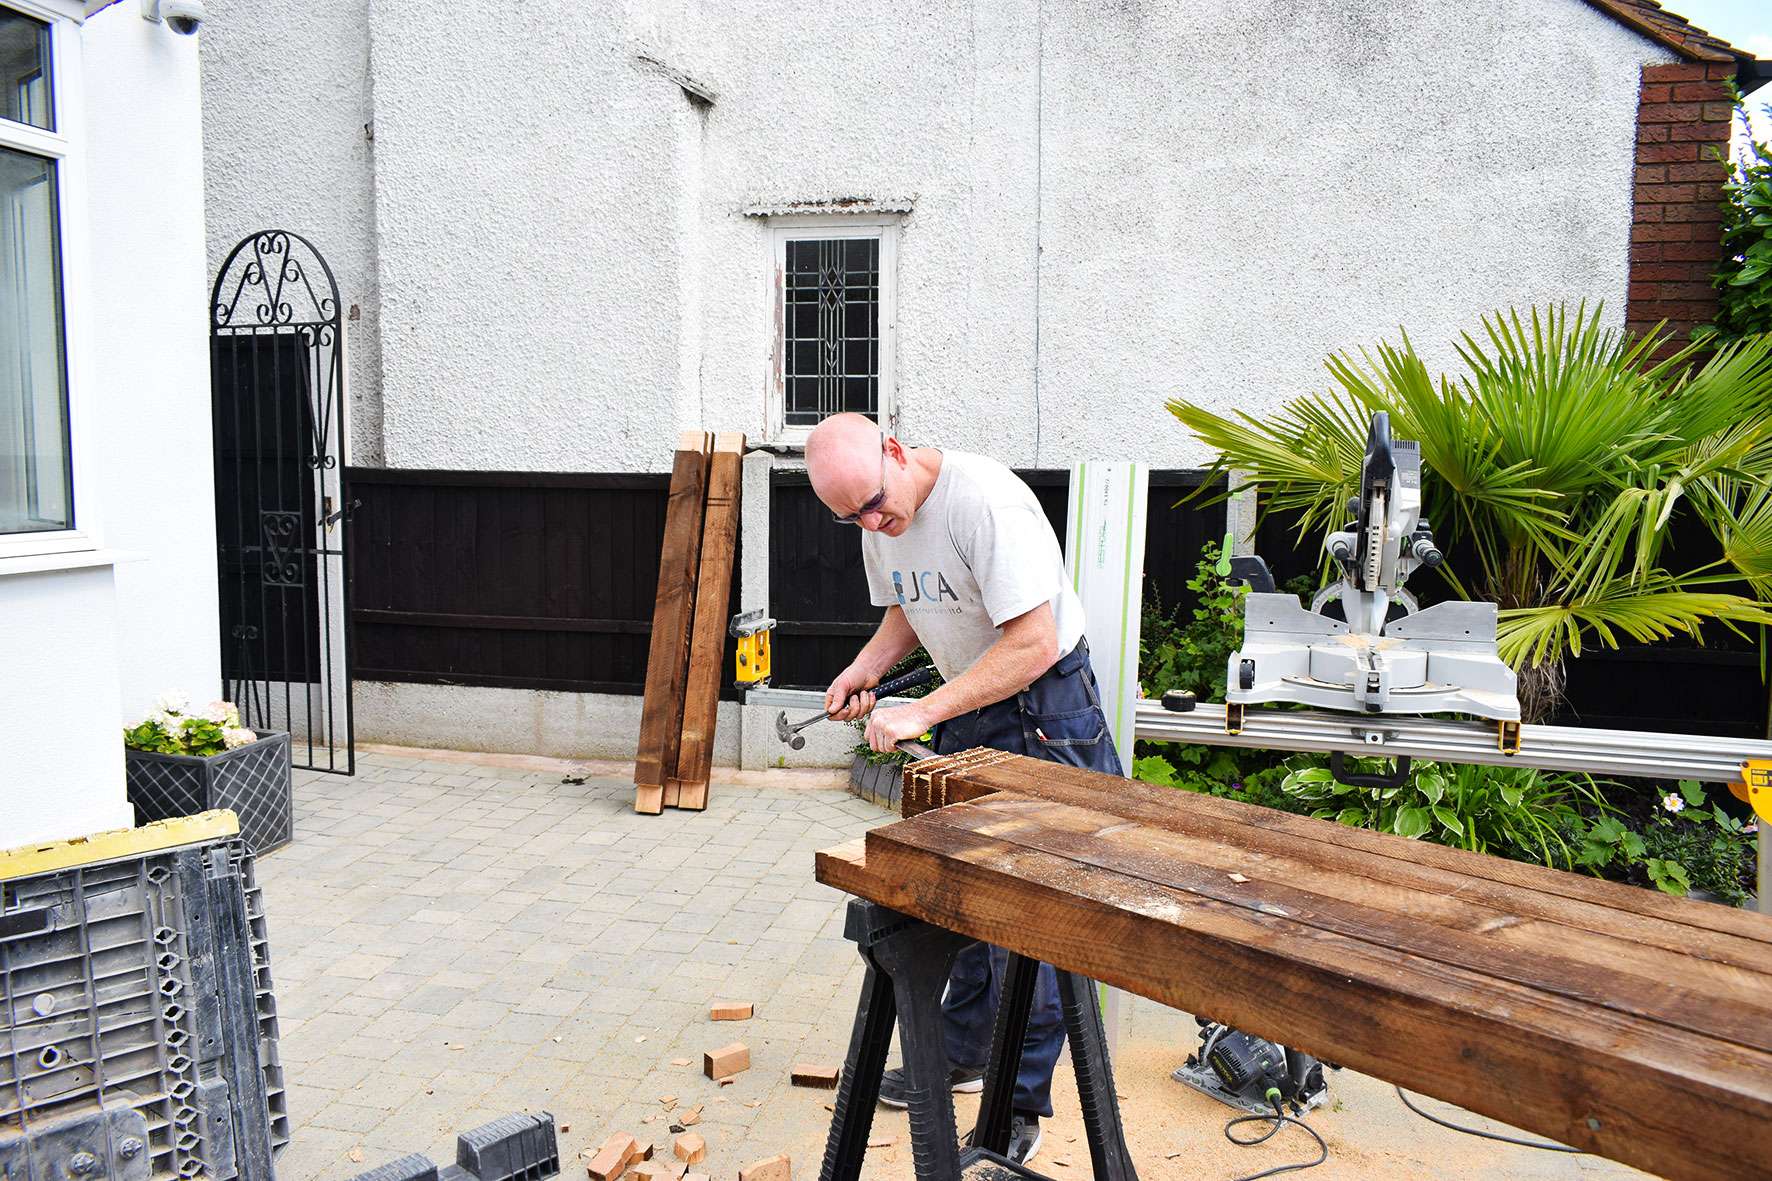
Cut the other incised post in half using a chop saw or hand saw. Repeat the process making housing joints on each end. So for one screen, you will have 2 of the long, and 2 of the short lengths below.
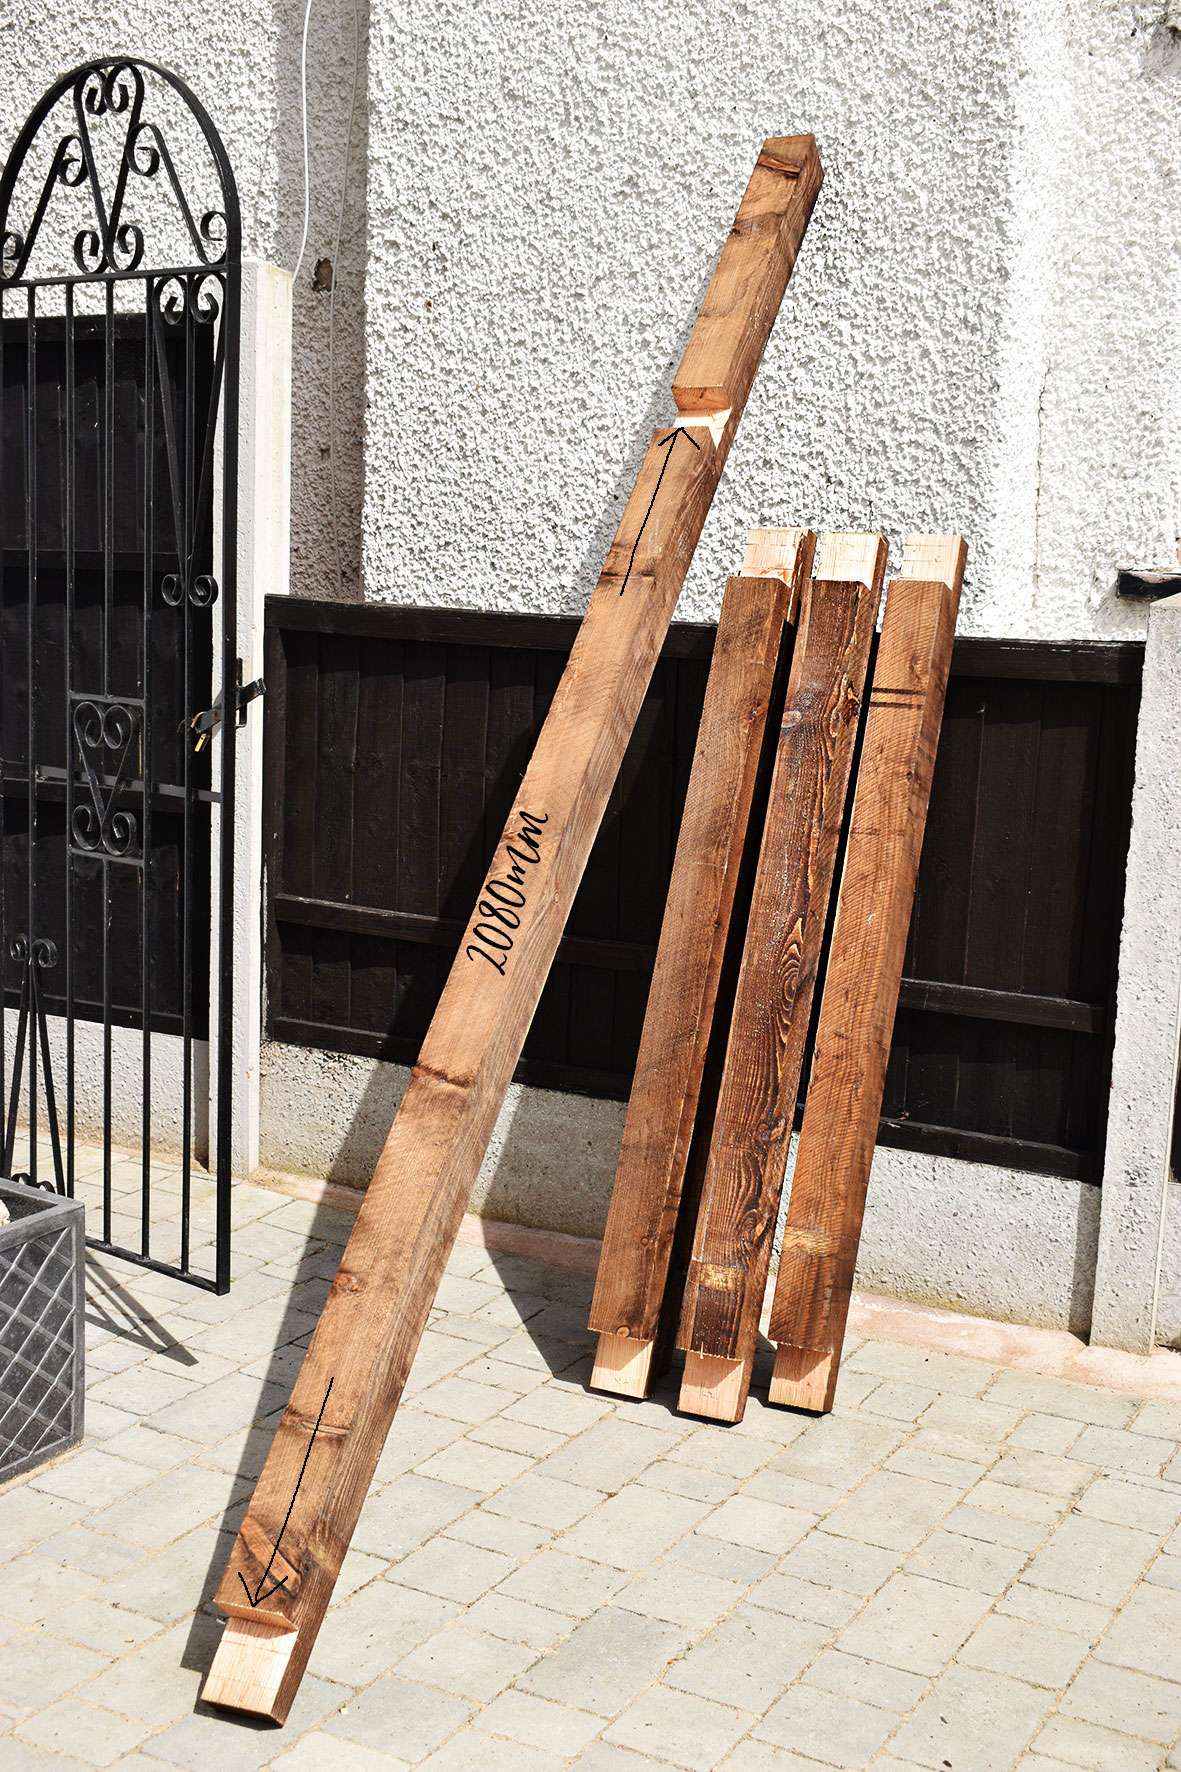
Lay the short posts on their side and drill 10 x 12mm holes 50mm deep, 100mm apart, along the centre, starting 100mm from the inner edge of the housing joint.
Step 2 – How To Make A Wine Bottle Screen
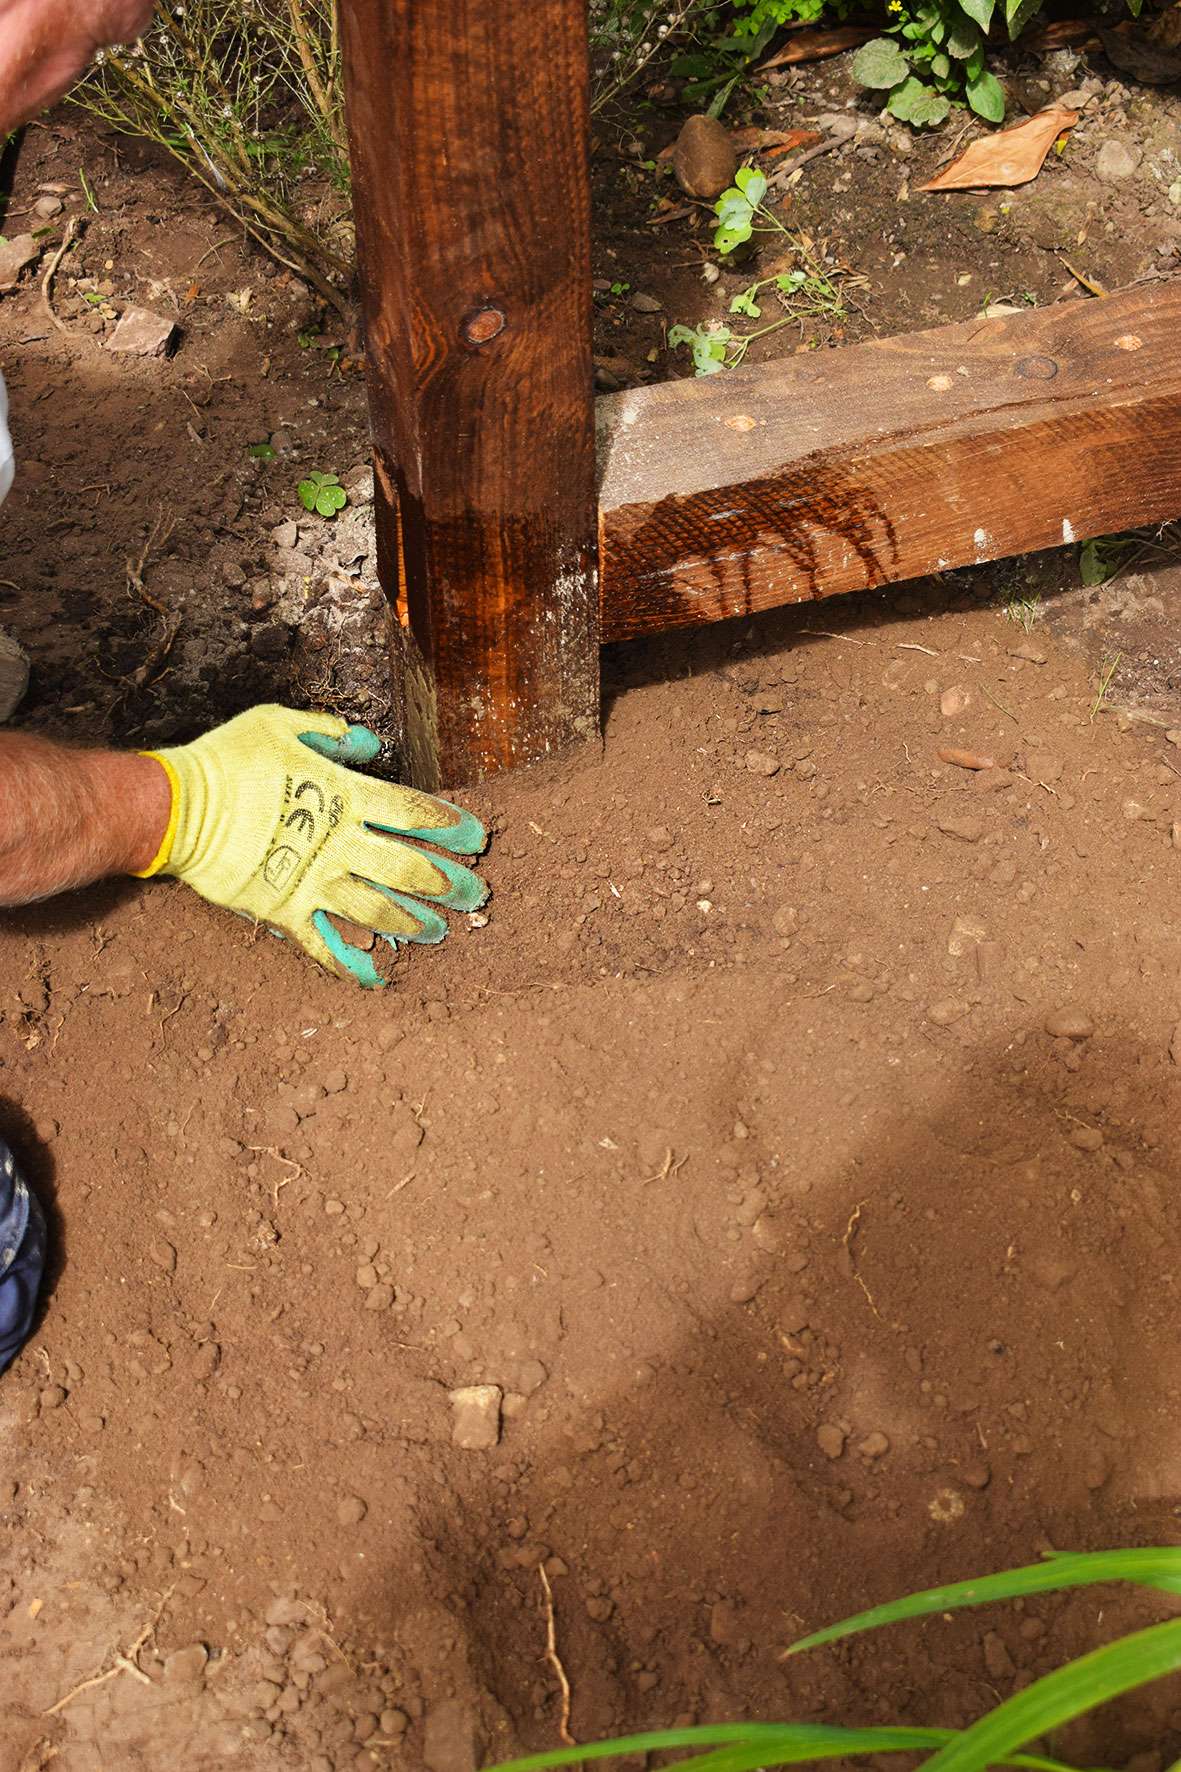
To erect the frame dig a 2ft hole and insert the 3m post so the start of the housing joint is 120mm above the ground and facing the back. Fill the hole with a few litres of water.

Pour in the fast set concrete mixture.
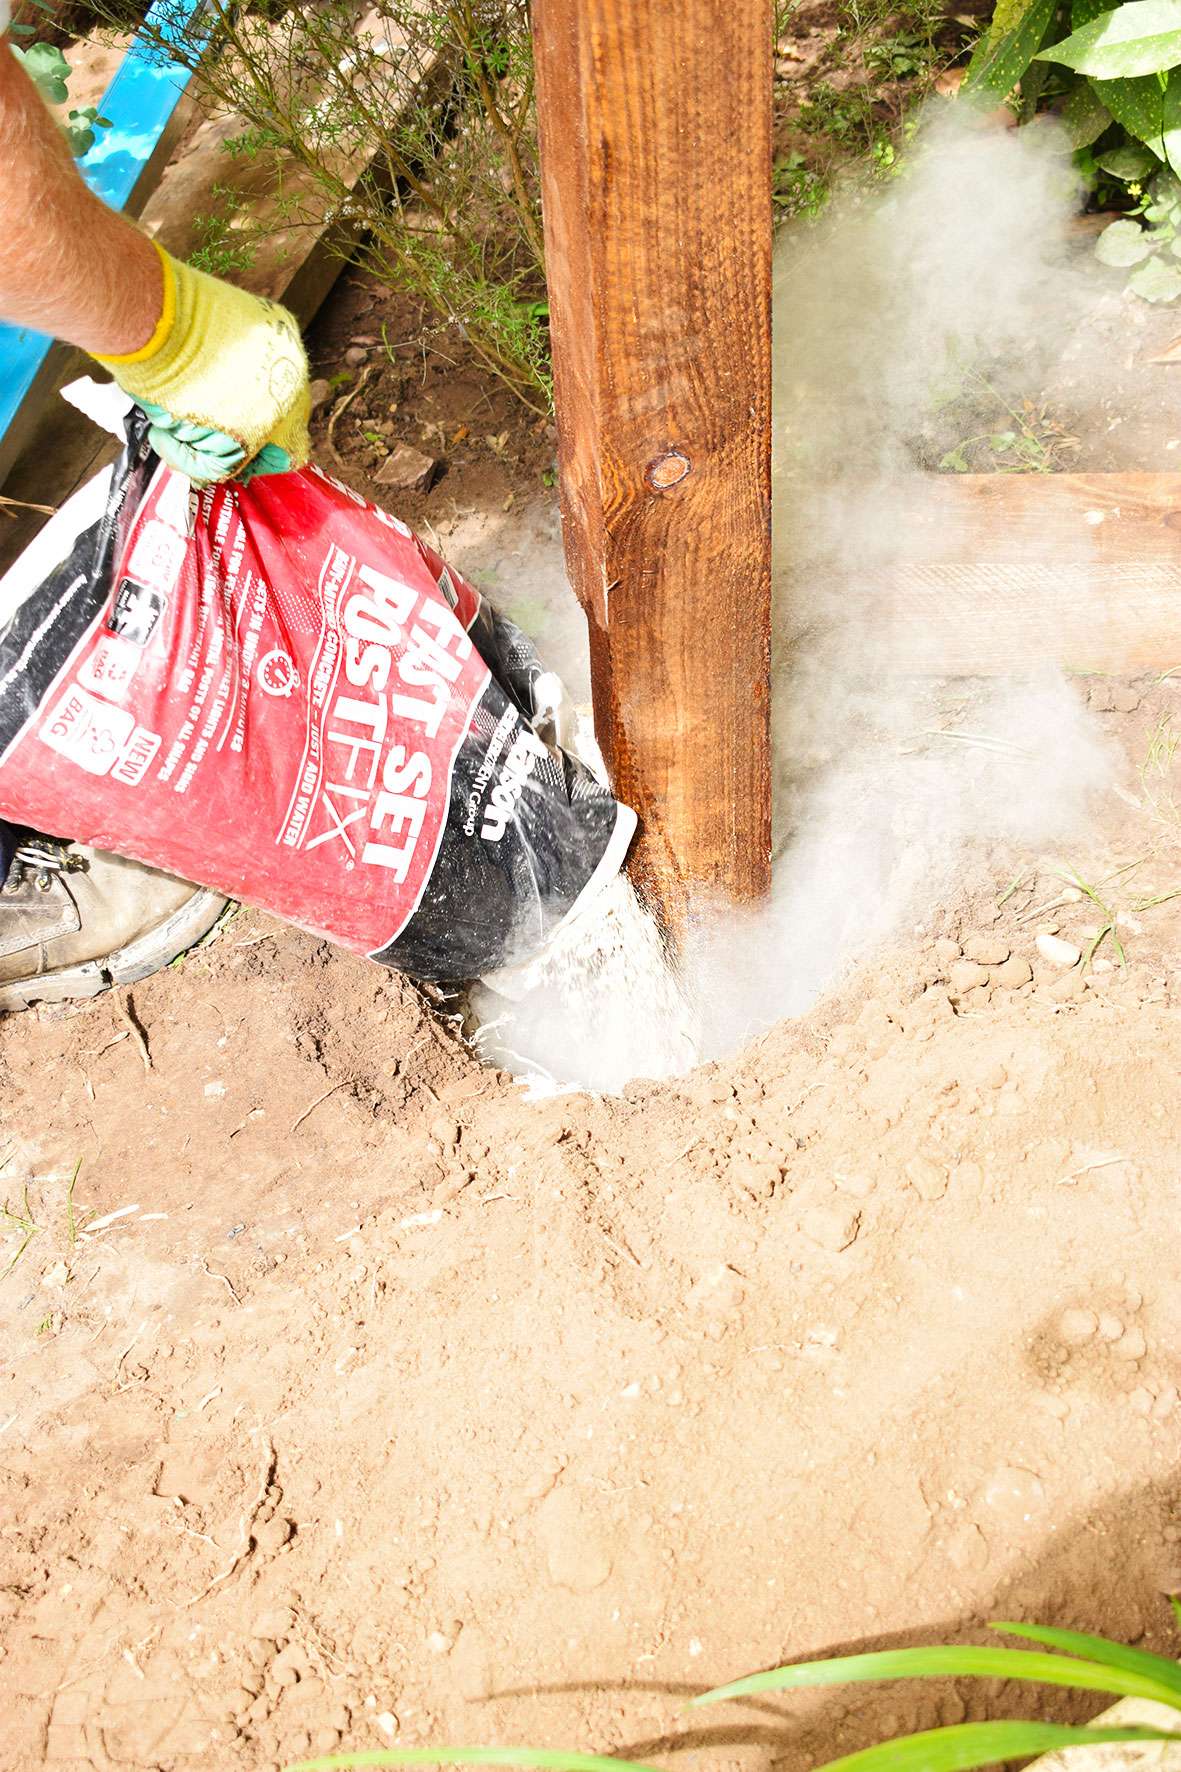
Then pat down the concrete mix using a piece of wood.
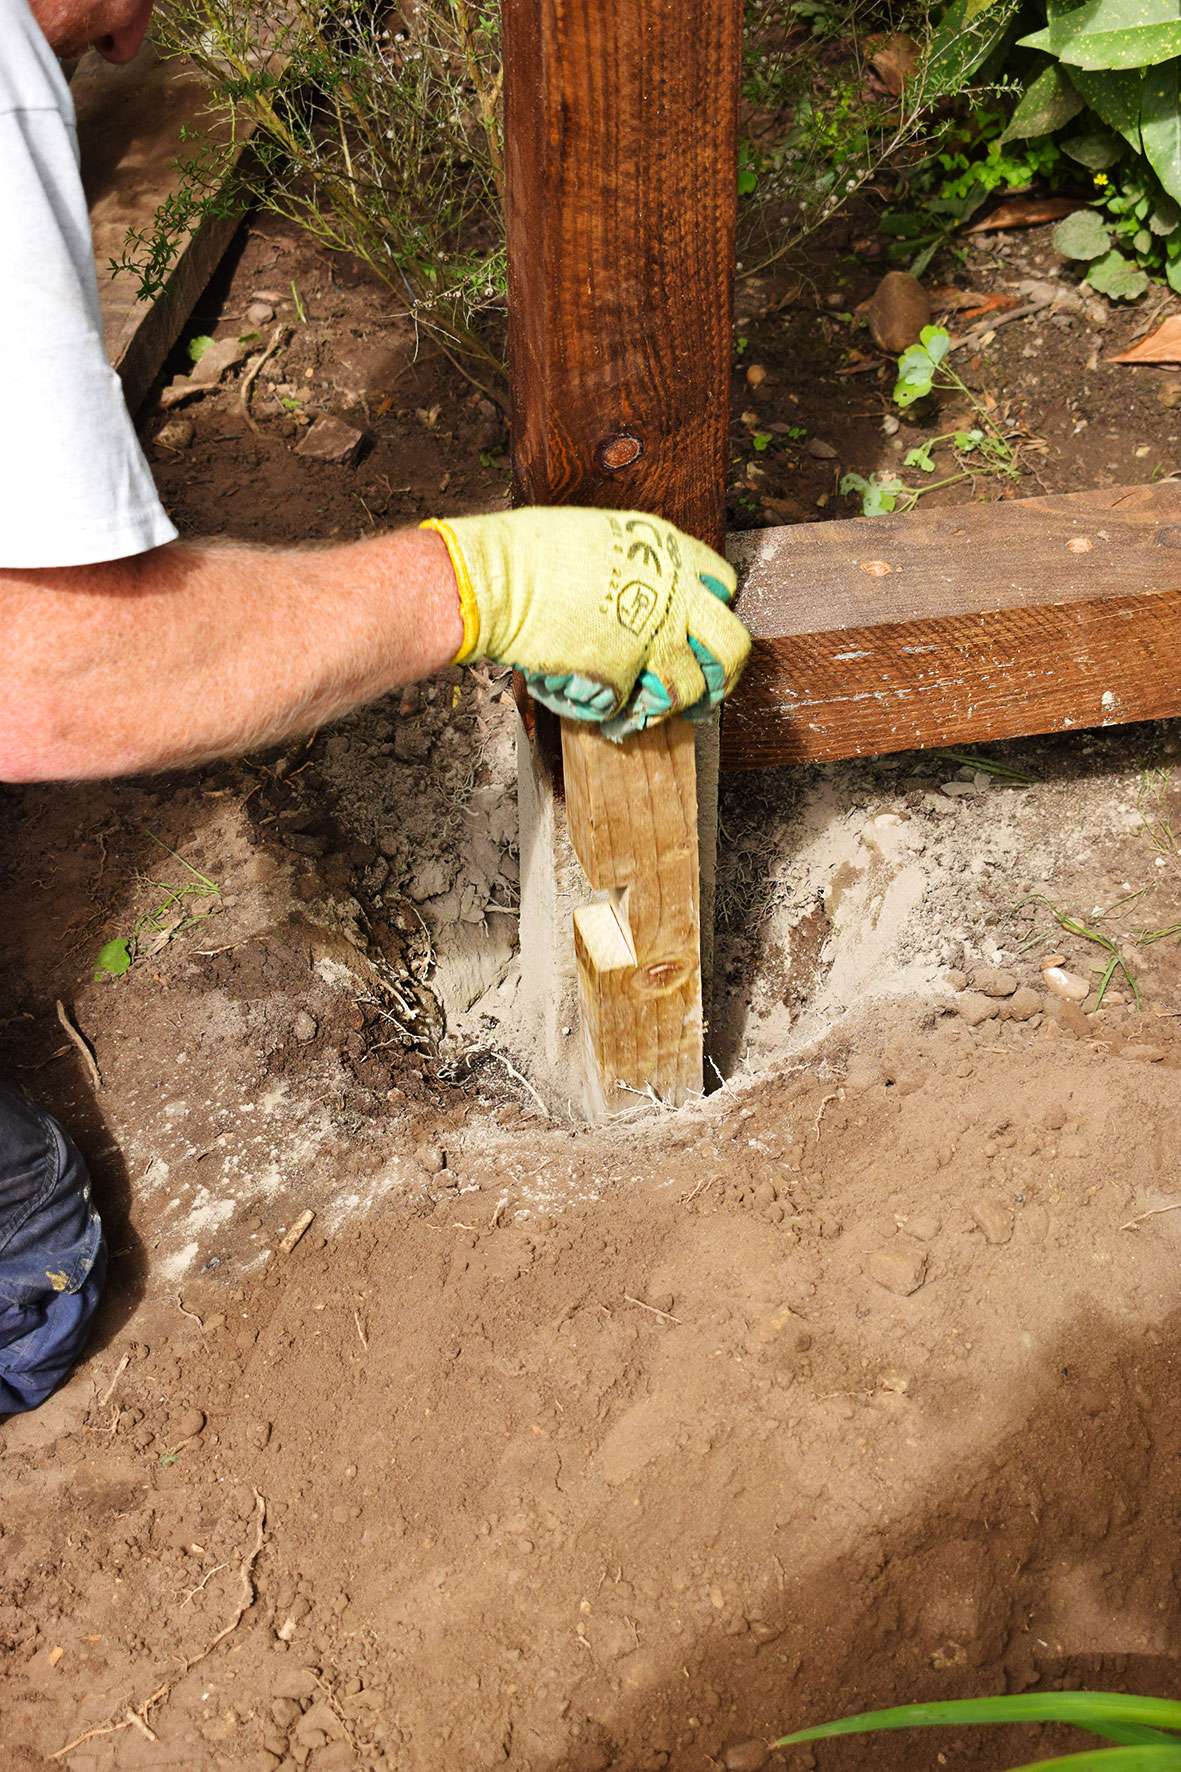
Ensure the post is straight using a spirit level.

Fill the rest of the hole with soil, patting it firmly around the post, again using a piece of wood.
Repeat with the 2nd 3m length post on the other side, leaving a distance of 1300mm apart. You can use the bottom post as a datum for how wide the distance needs to be.
Next, join the housing joints of the drilled incised post (drill holes face up), to the housing joints of the side posts.
Step 3 – How To Make A Wine Bottle Screen
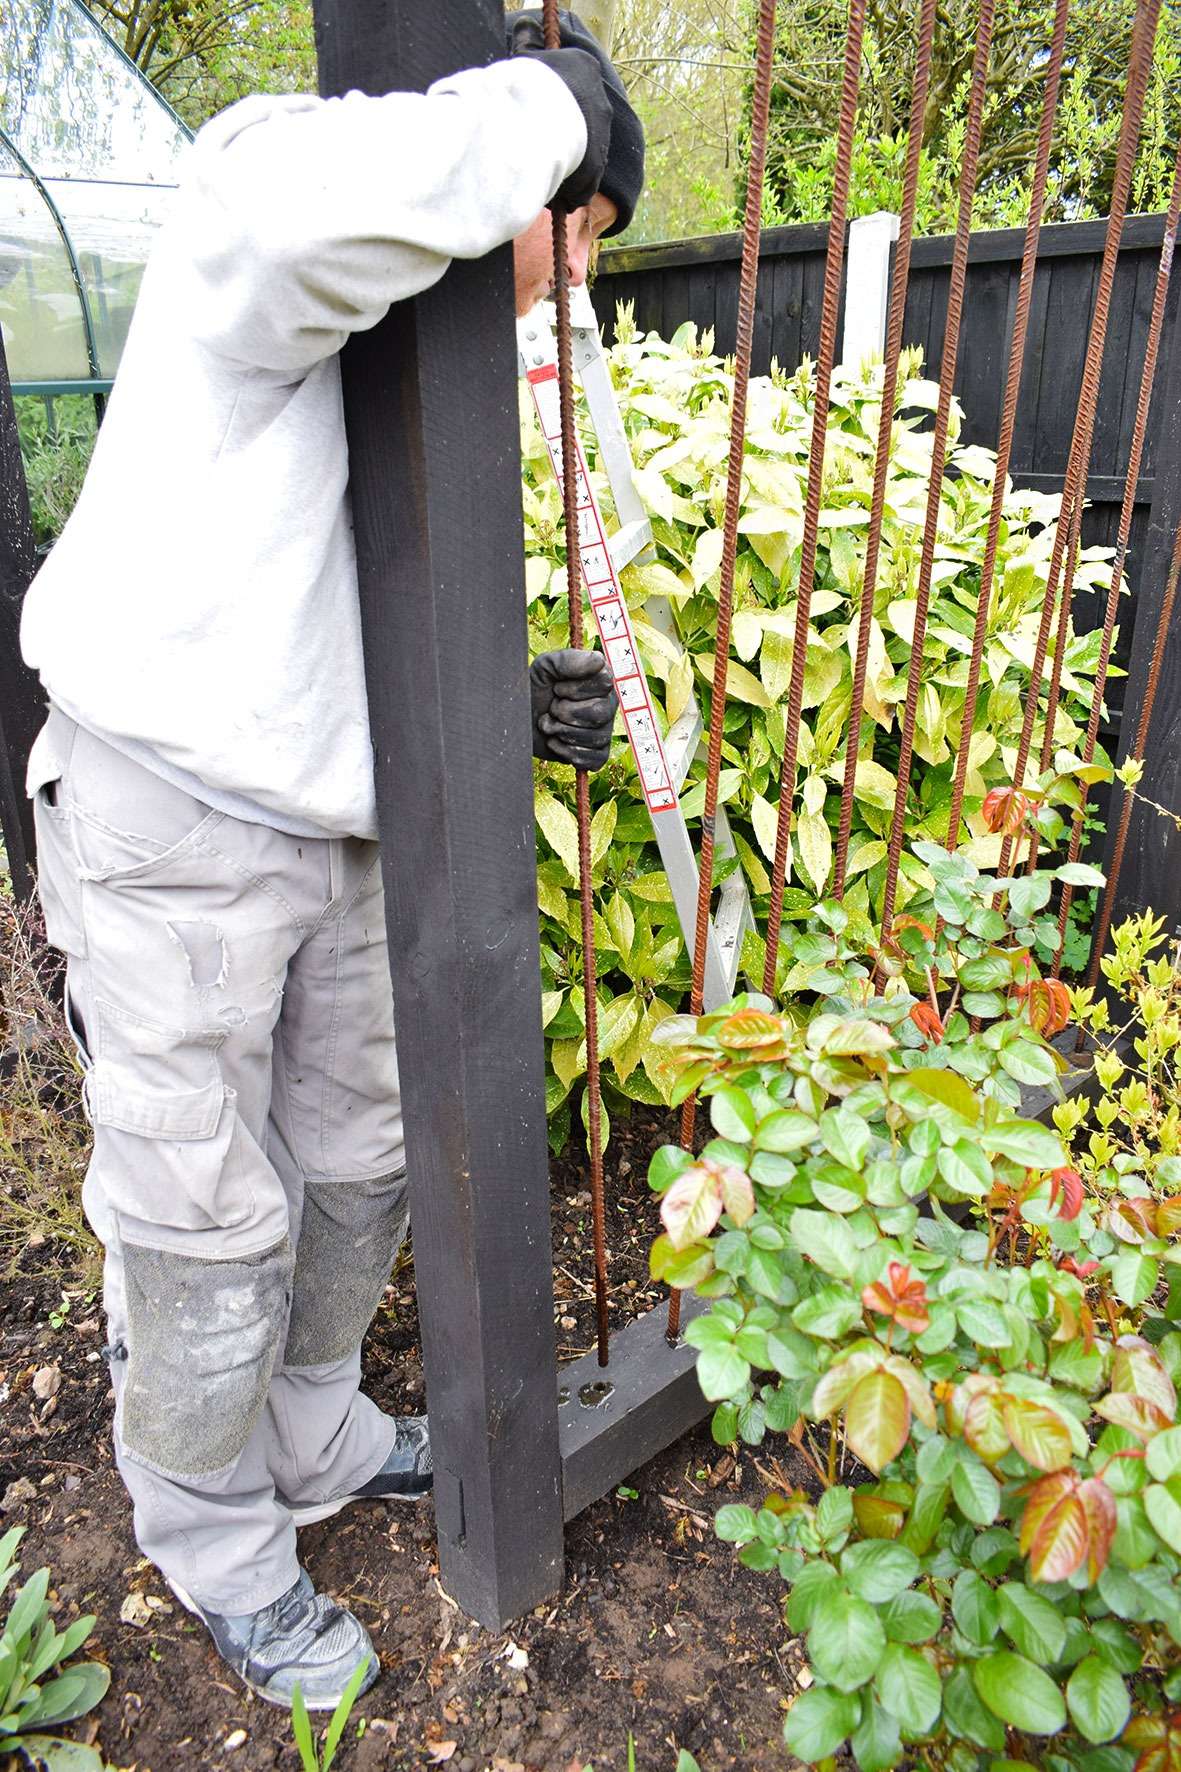
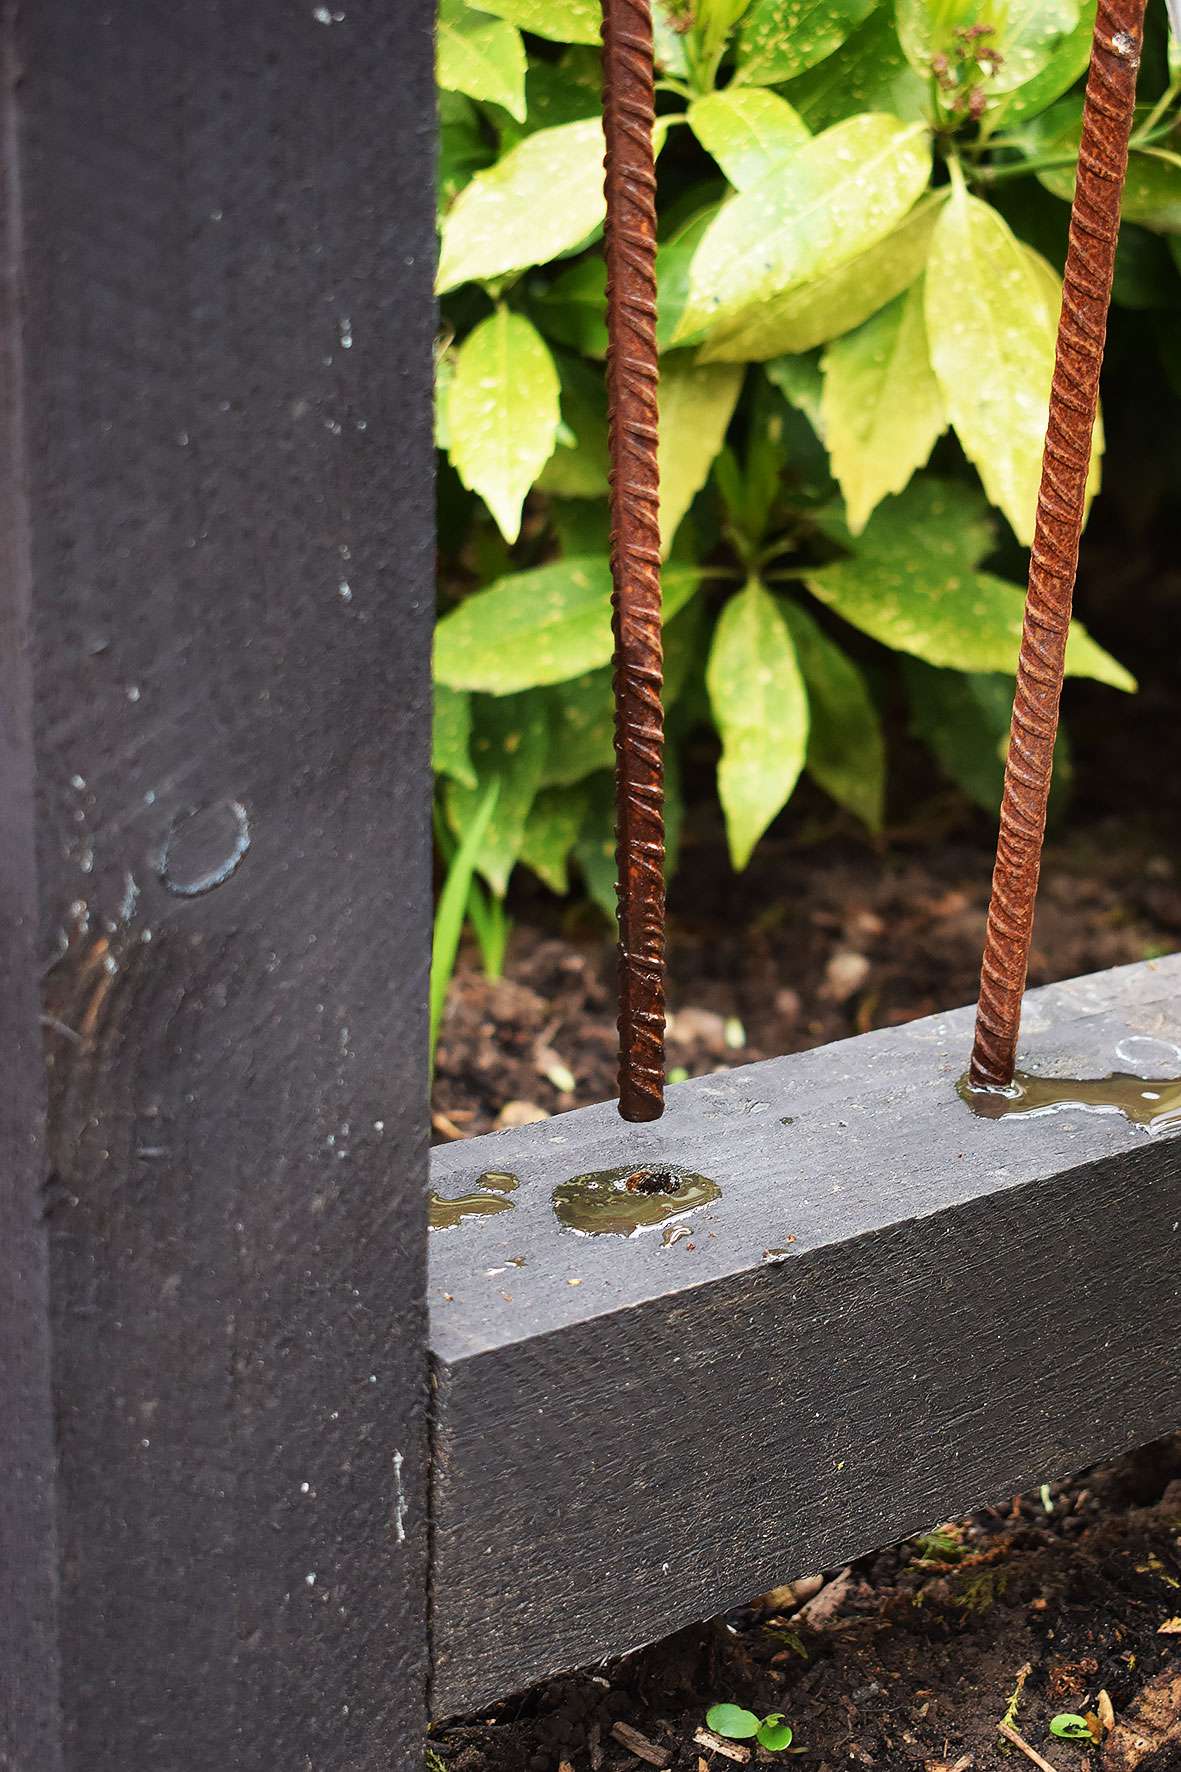
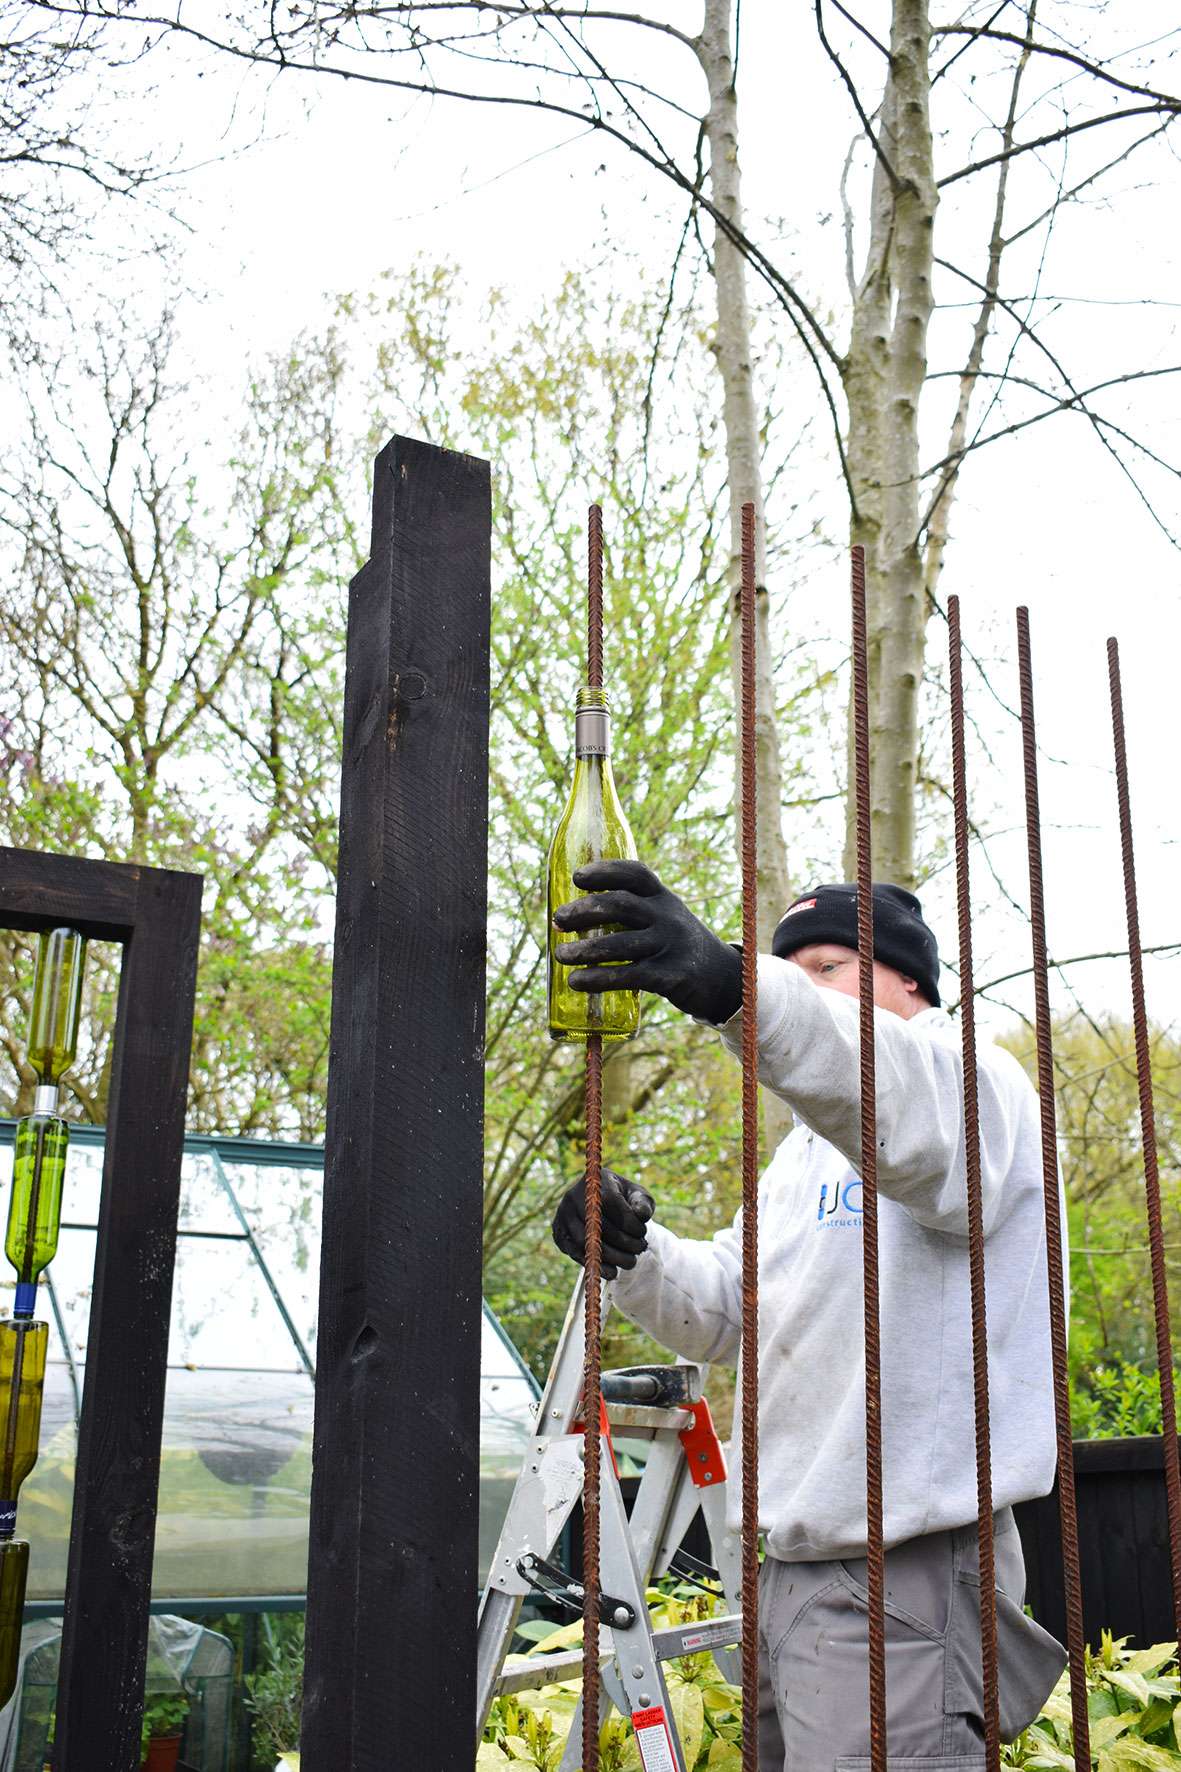
Paint the frames in your chosen colour (I used black fence paint) and fit the rebar into the drilled holes.
Step 4 – How To Make A Wine Bottle Screen
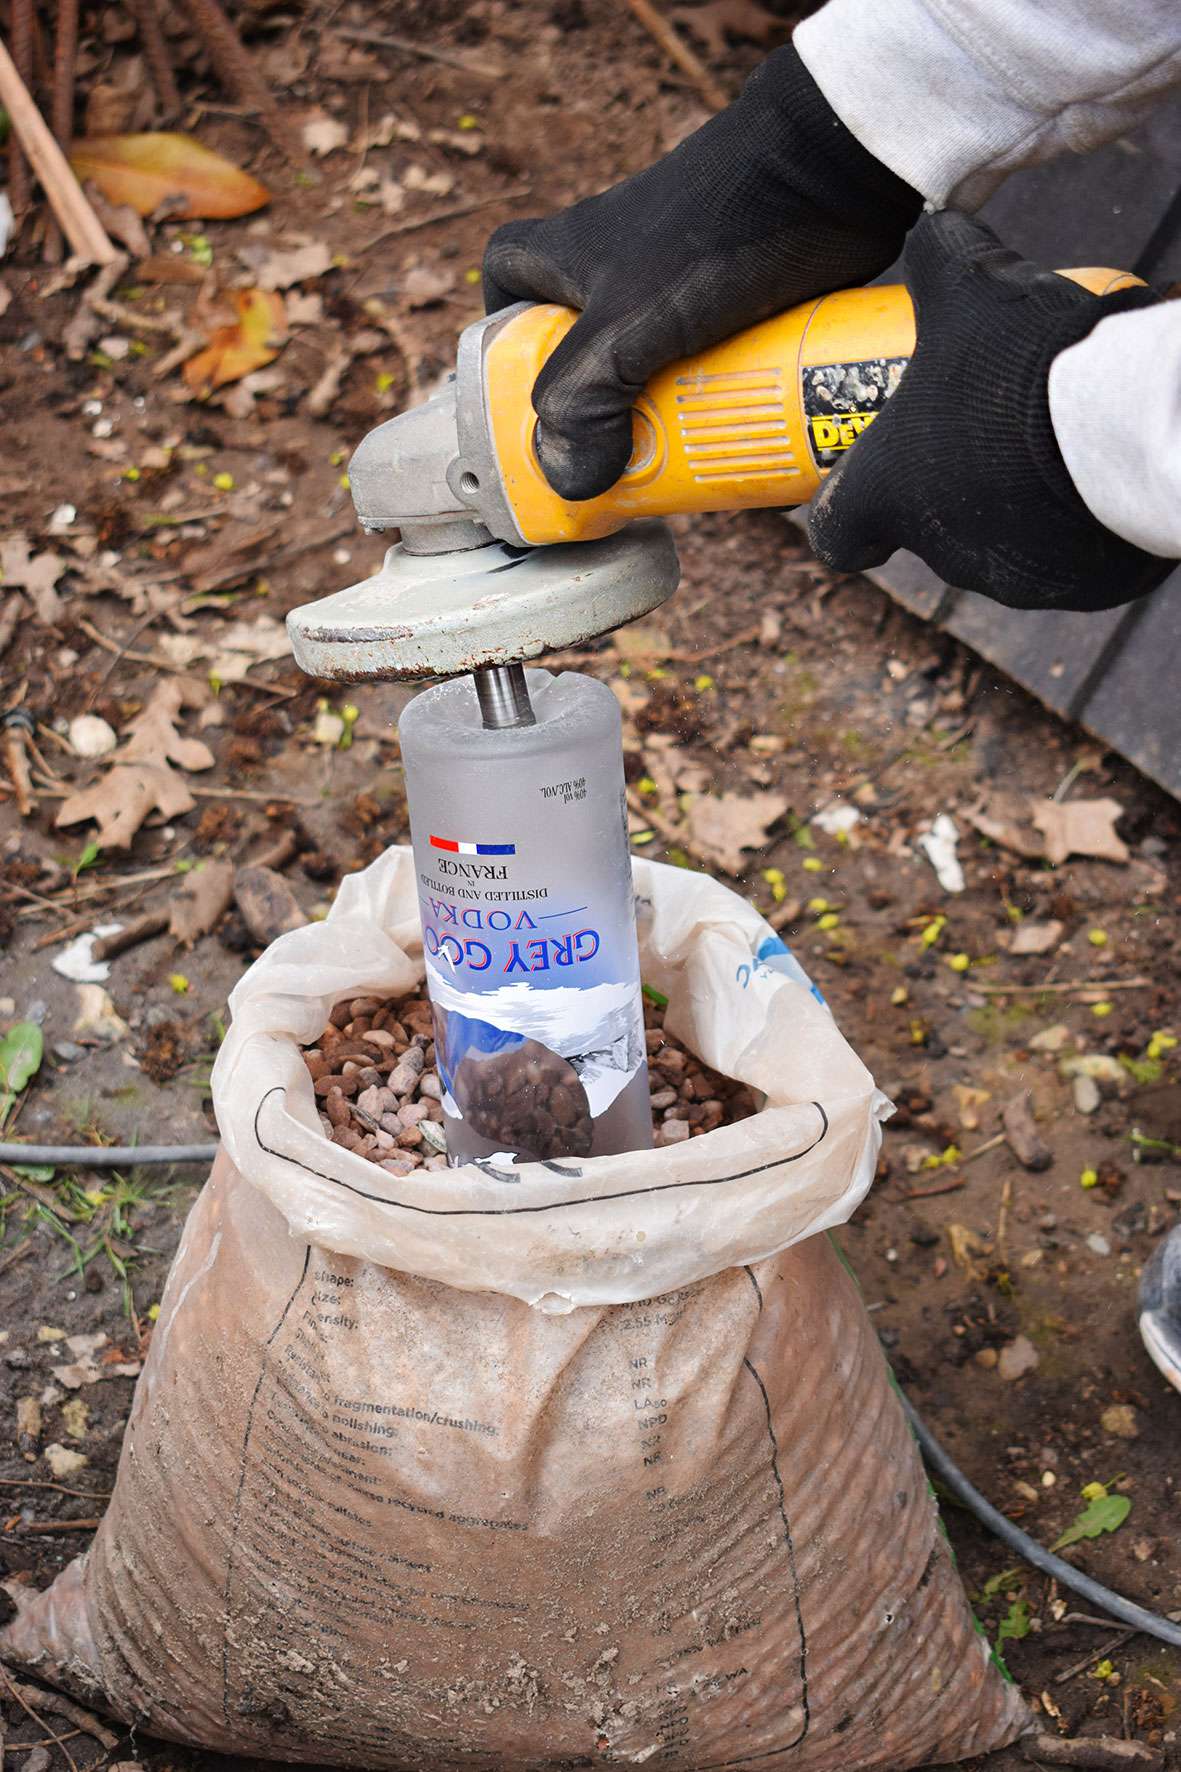
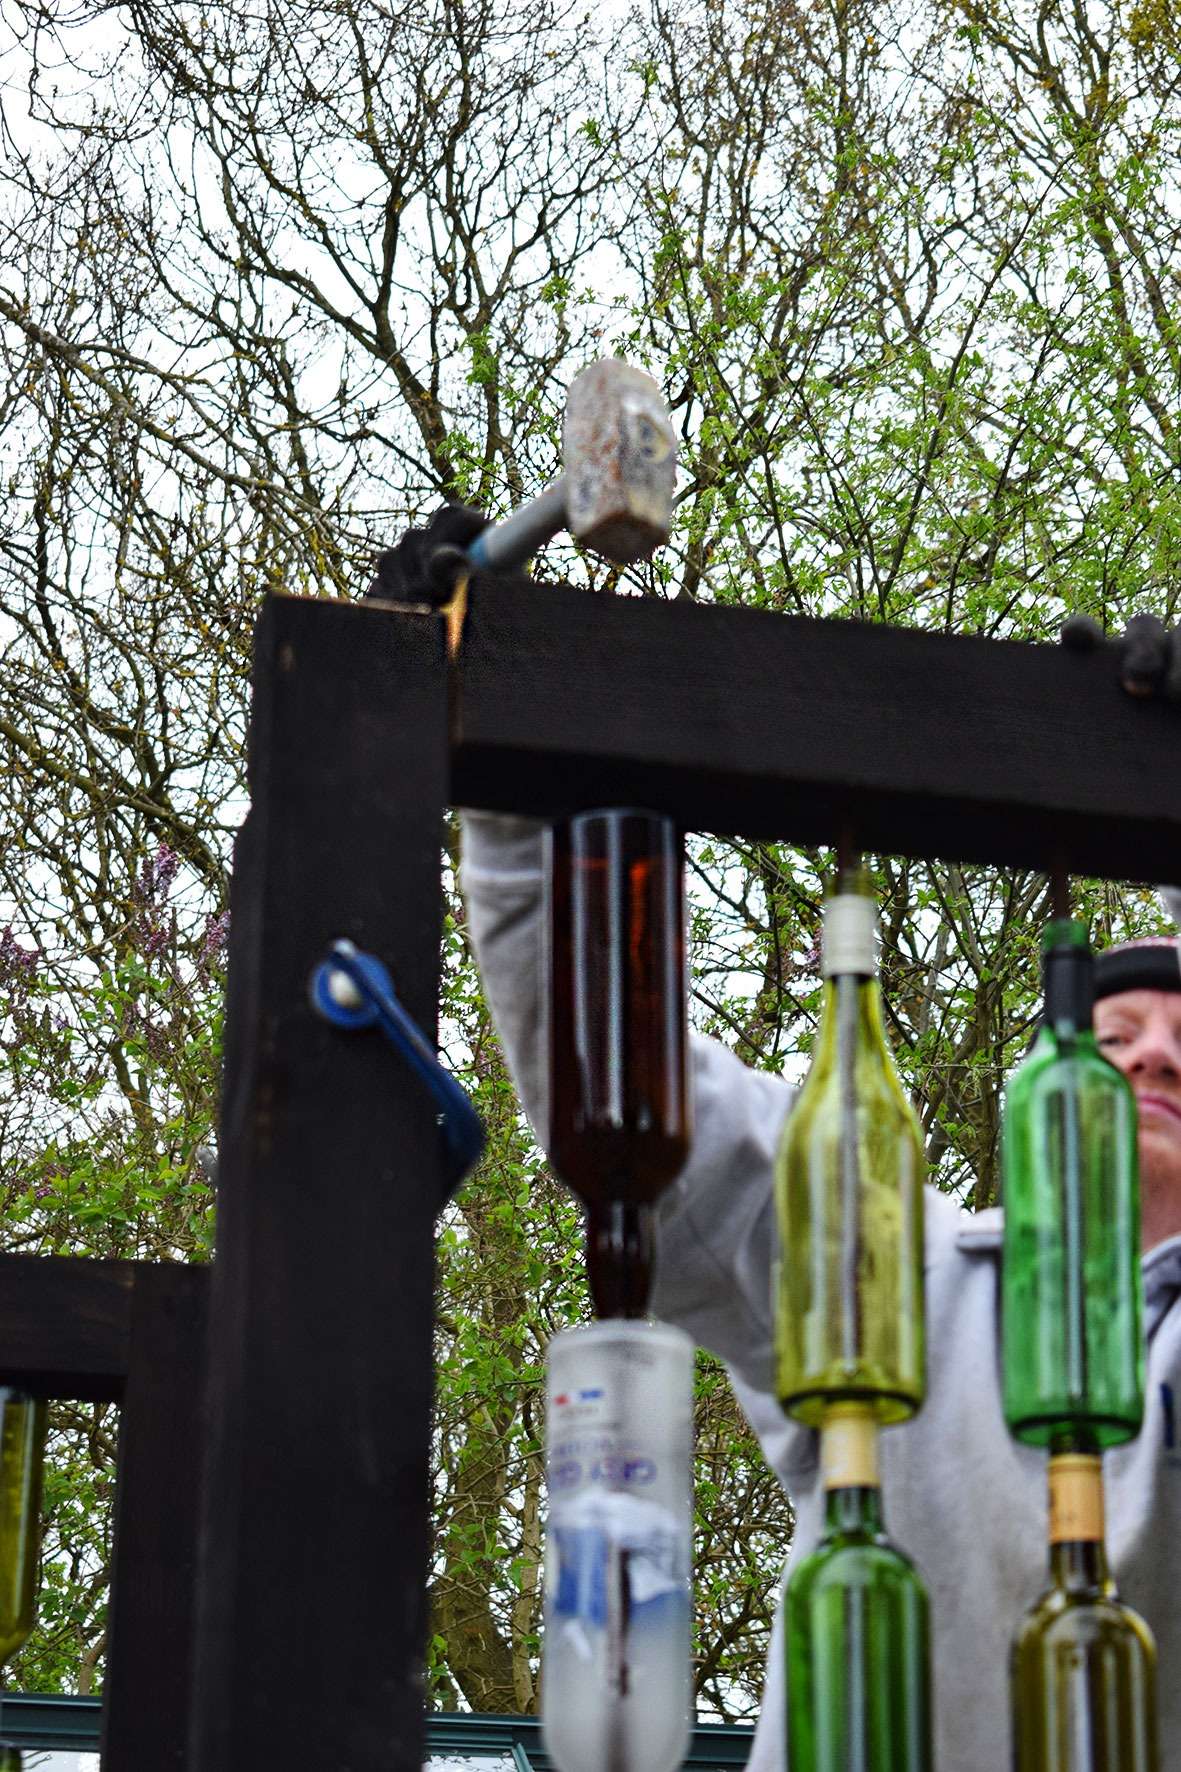
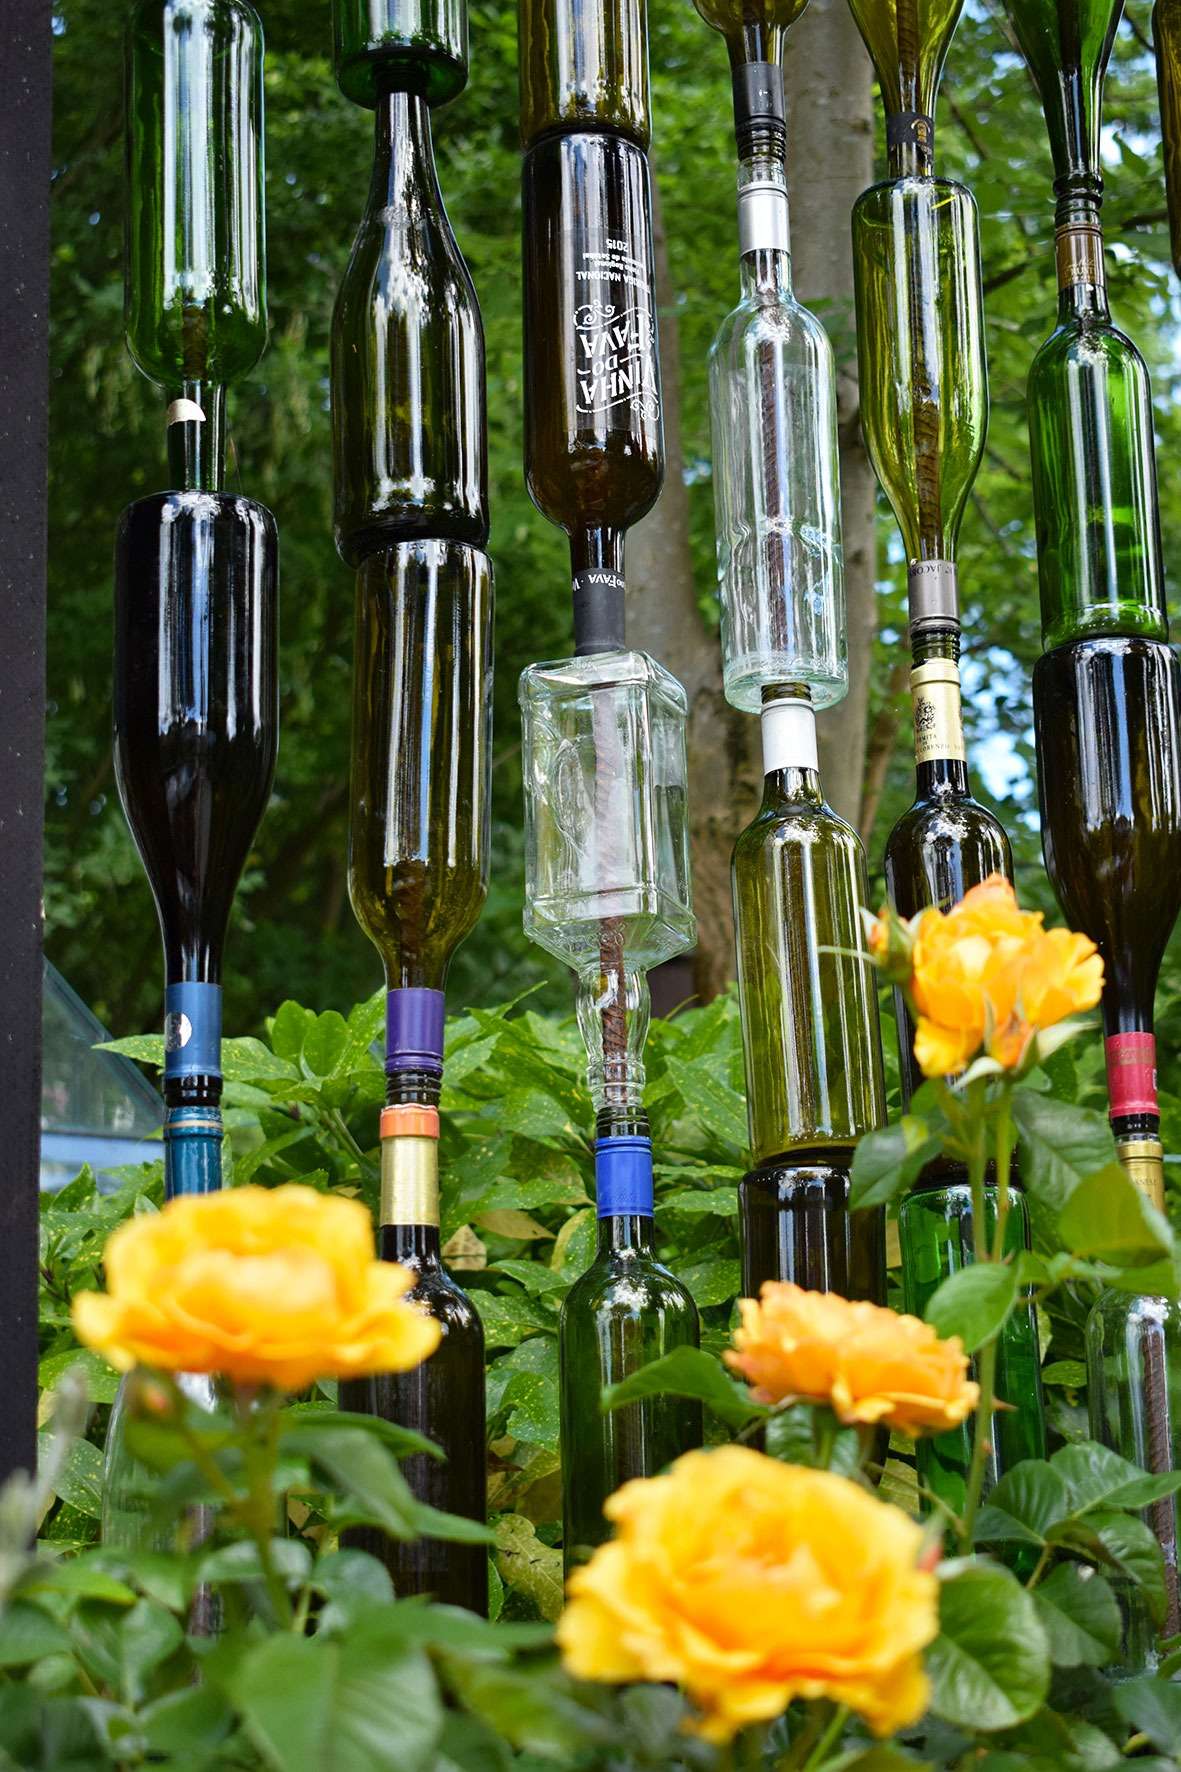
Place each bottle upside down in a bag of grit or sand and drill into the base centre using your angle grinder and diamond drill bit.
Slide your drilled bottles onto the rebar in a random style – some upright, some upside down, or in any style and order of your choice.
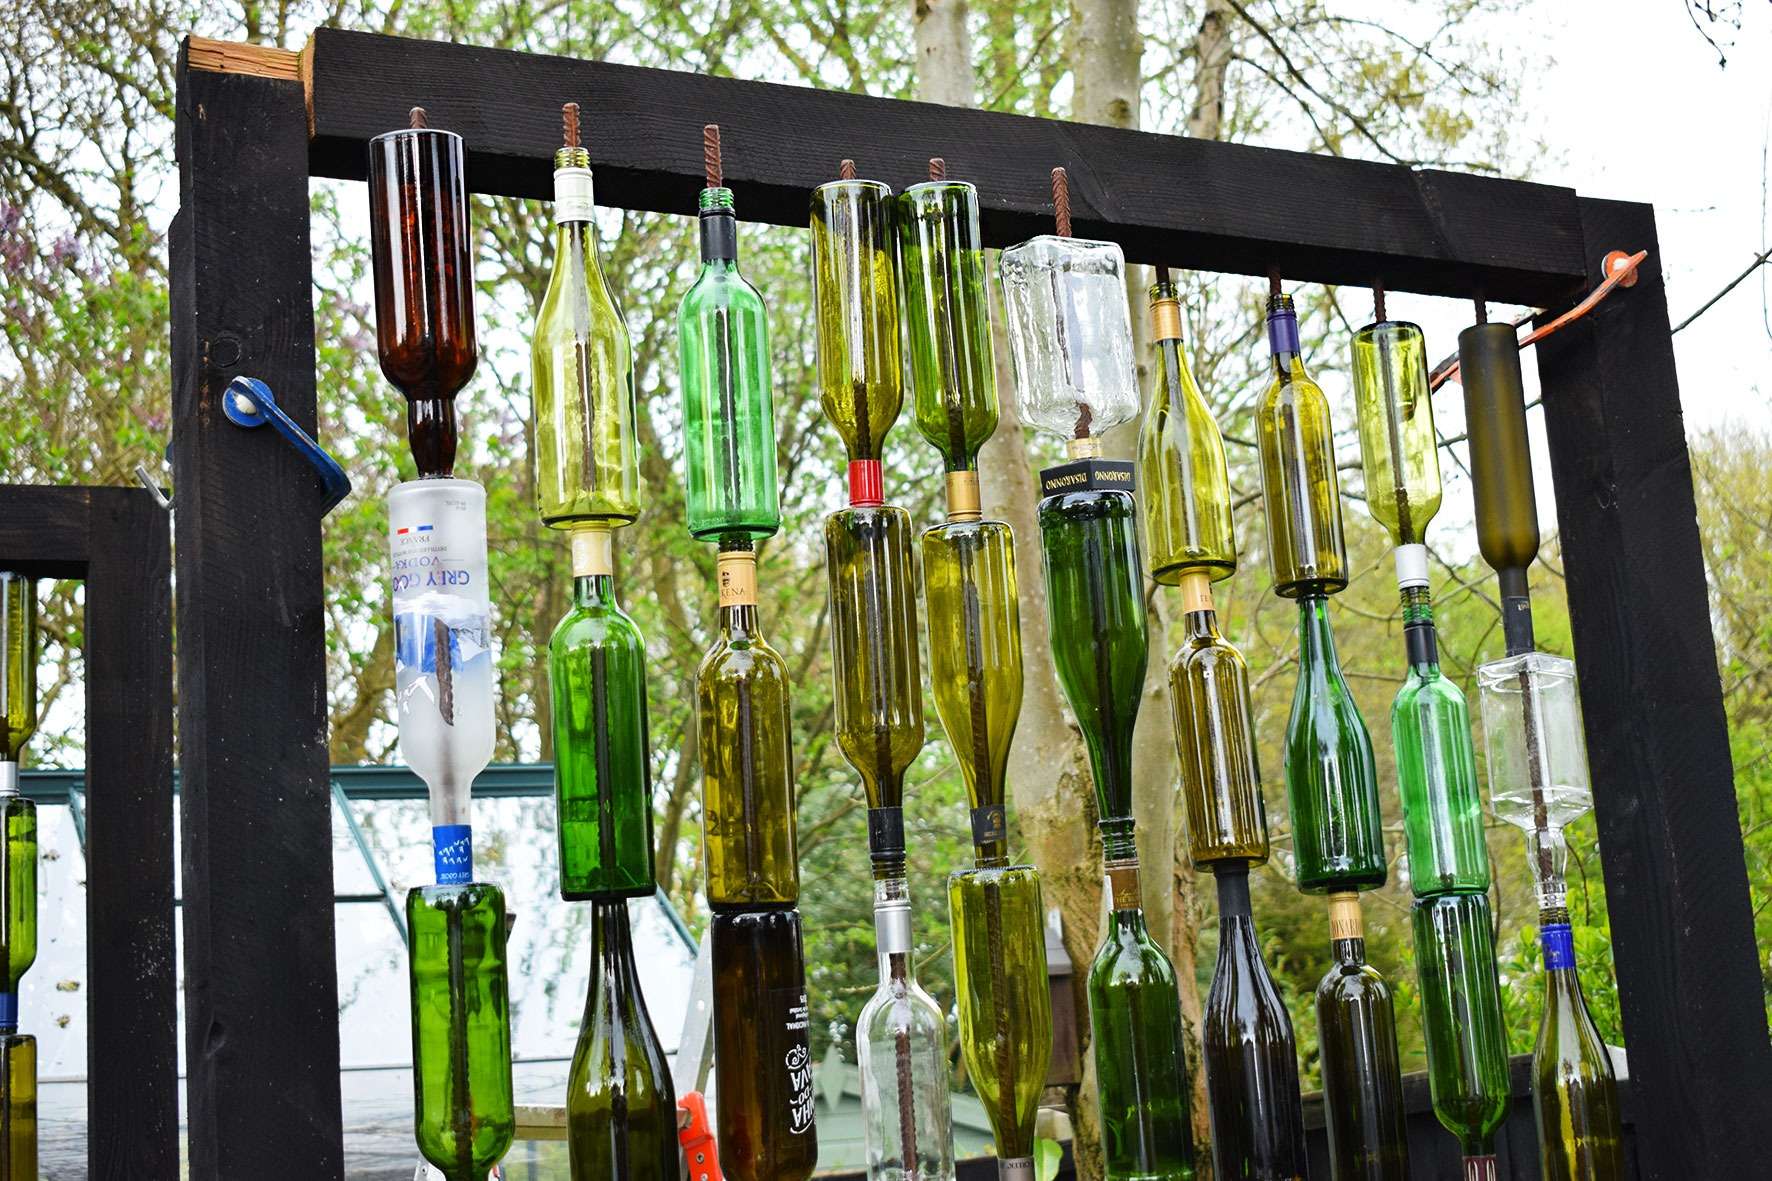
When all your bottles are in place, add the top of the frame (drill holes side down) clamping one side in place and inserting the rebar one by one into the drill holes (this part can be a bit tricky). Once done, hammer the top frame securely down with a lump hammer and screw the top of the frame in place as you did the bottom.
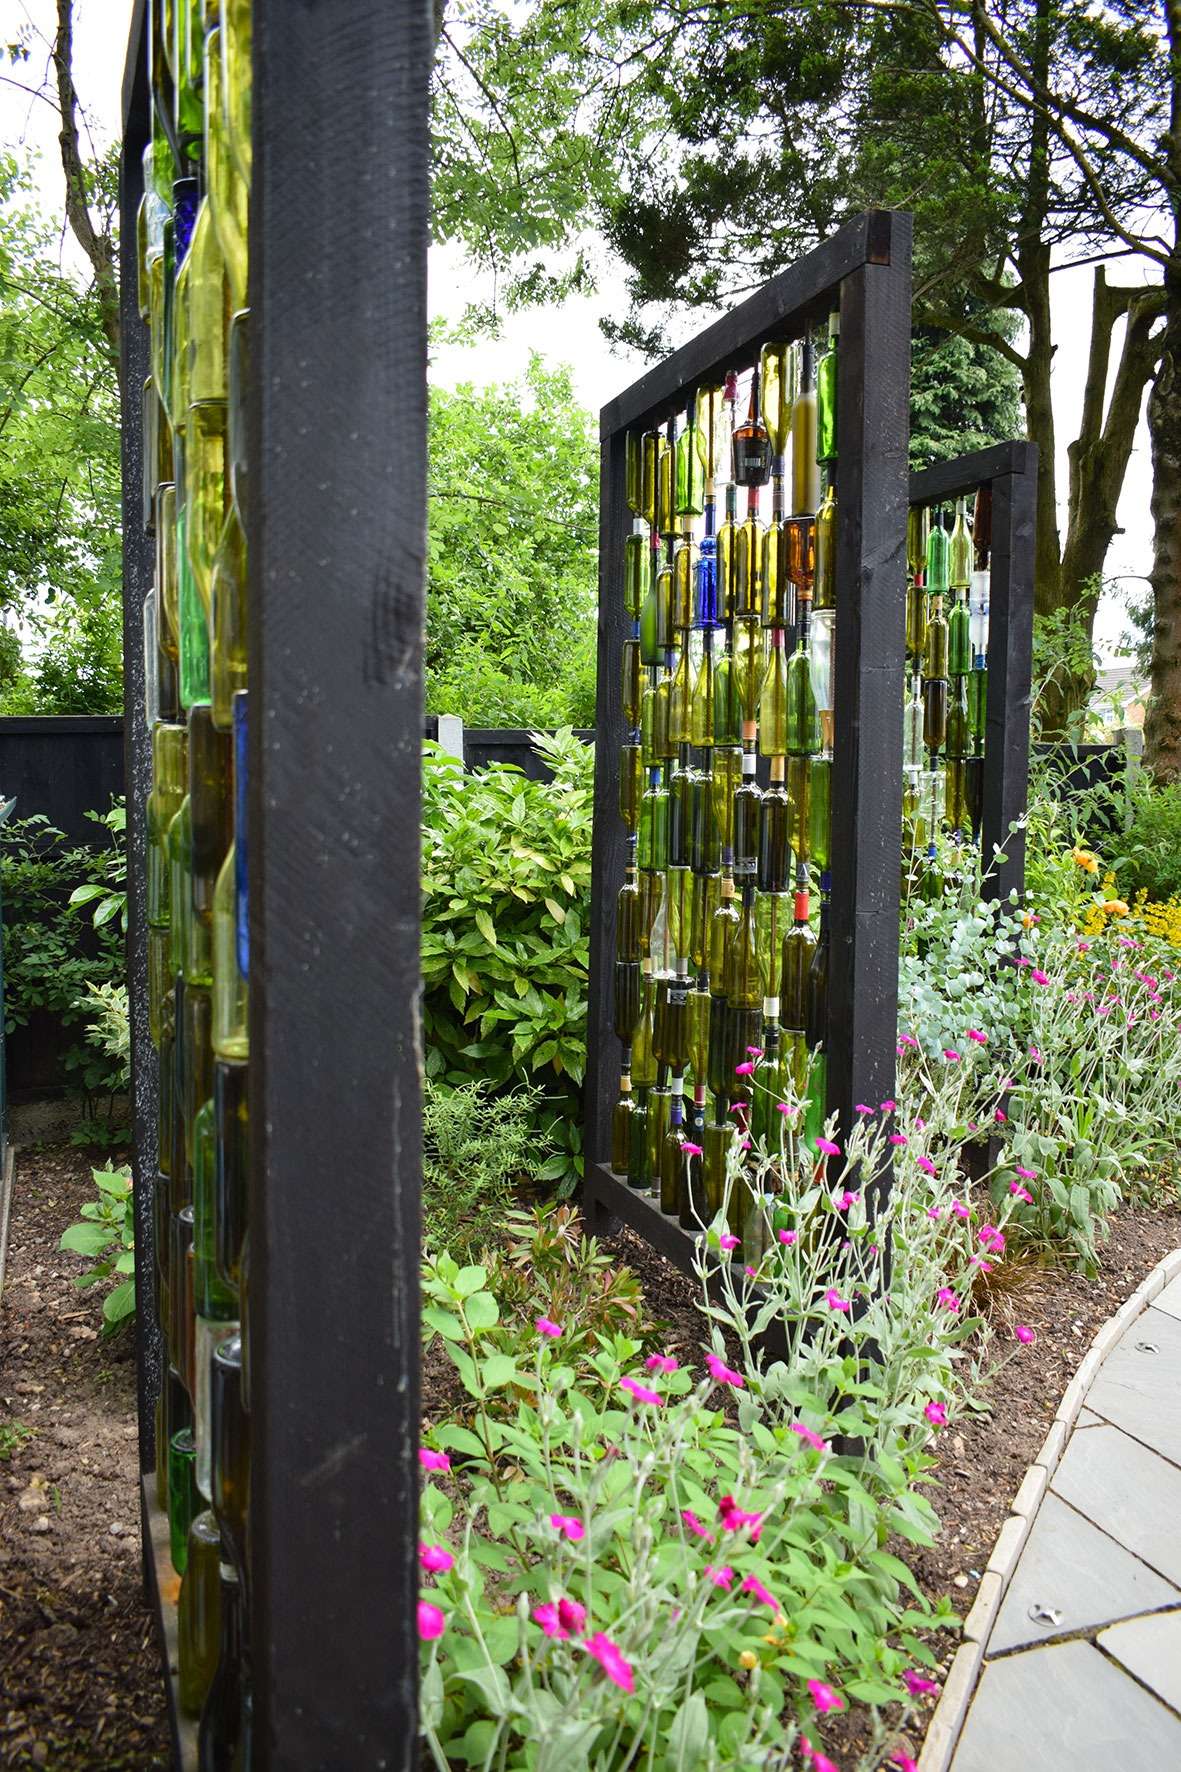
The screens not only serve a purpose but also add a fabulous feature to the garden.
For more fabulous FREE design content, join me on the Daring Home Decor podcast.

We added a few unusual coloured bottles to inject some interest.
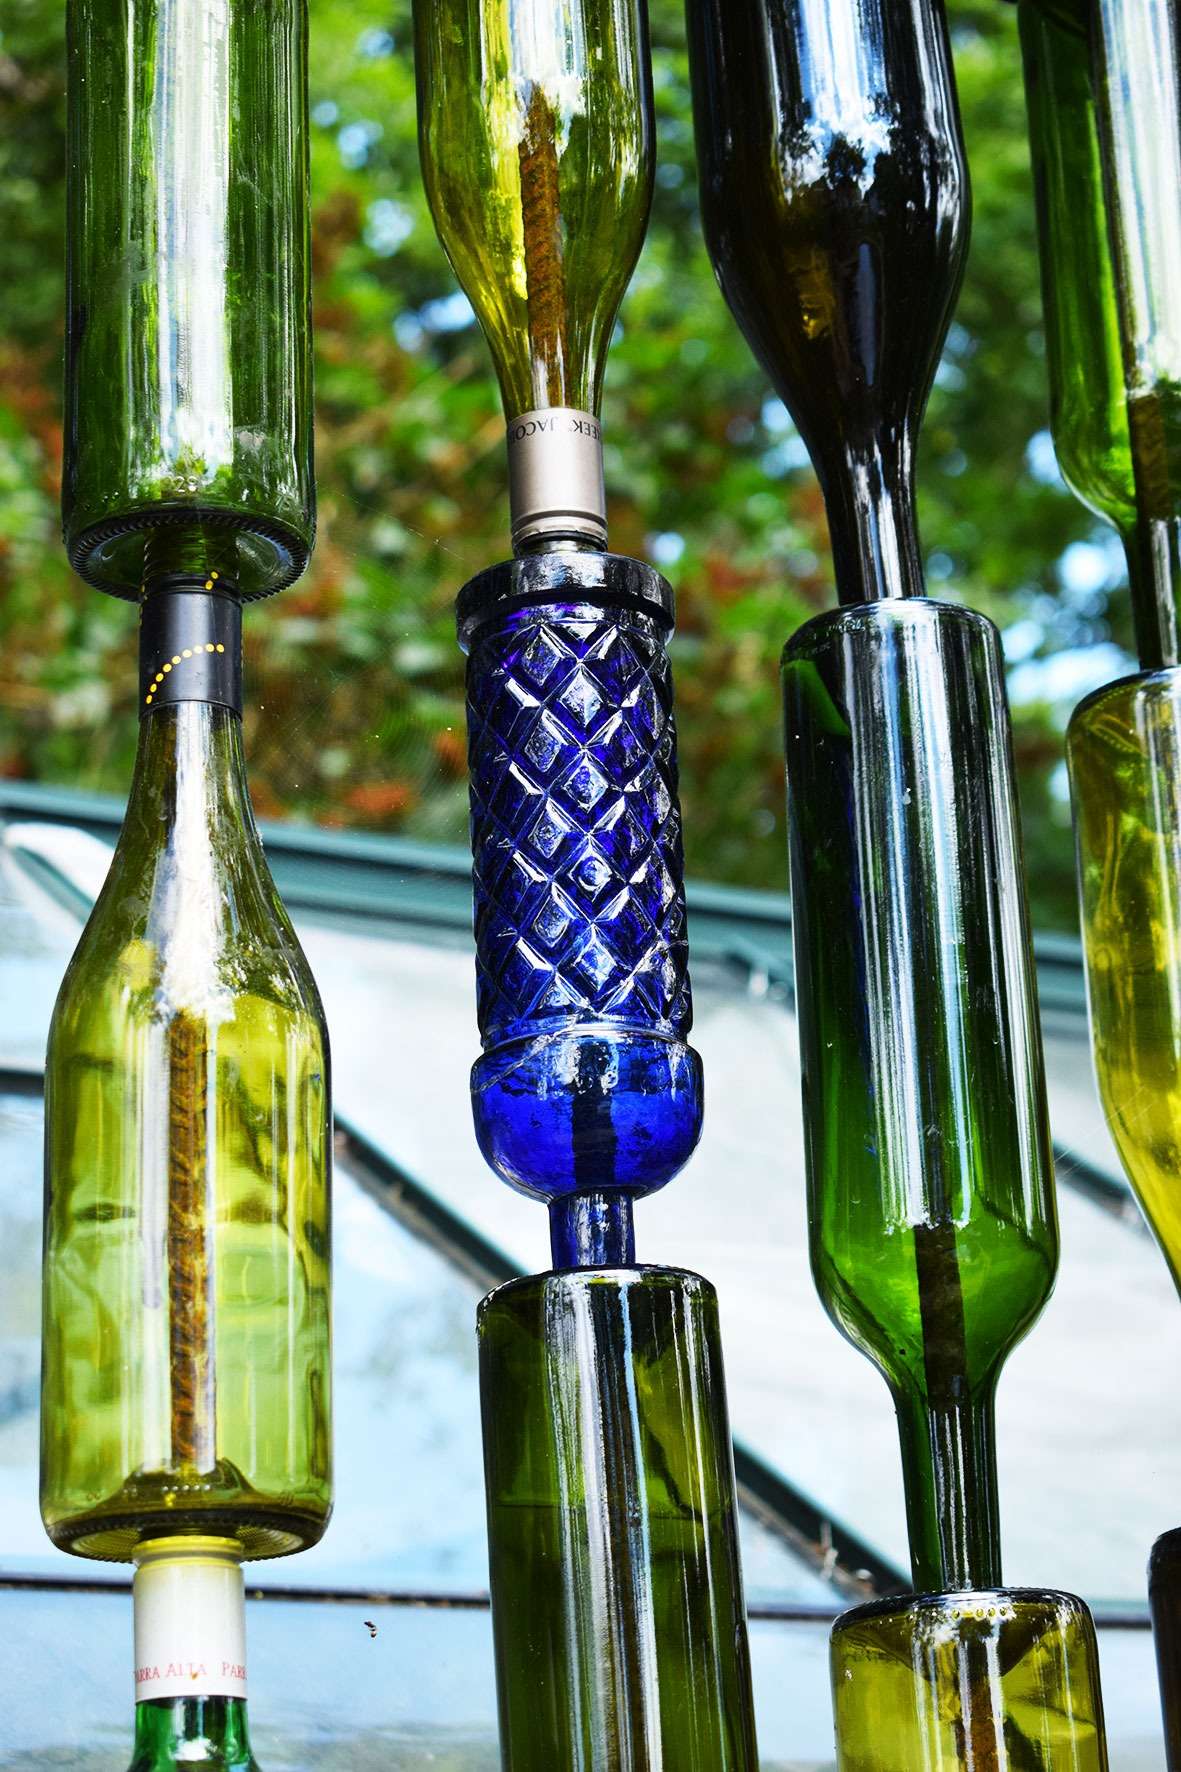
And left the labels on a few of them.
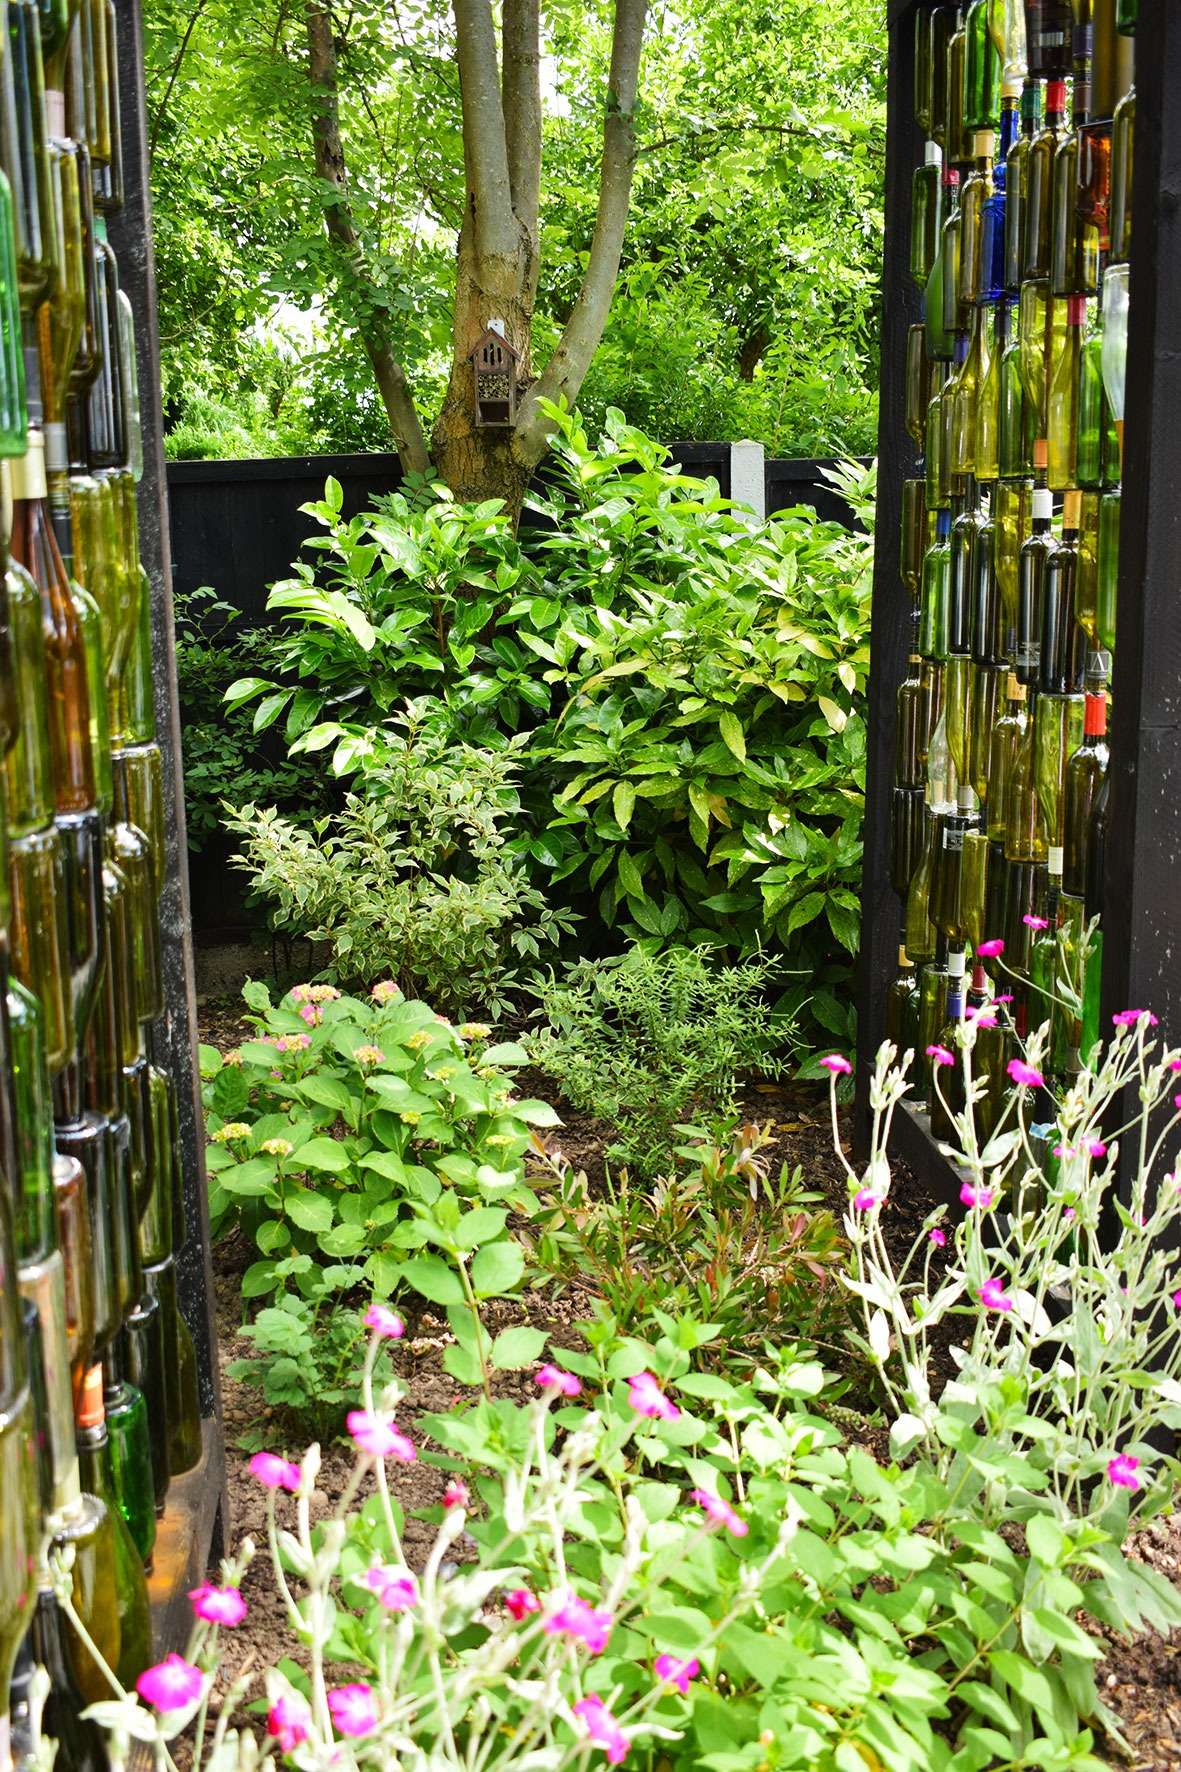
The screens change, depending on which part of the garden you look at them from. Here’s if you look at them head on, up close.

And further away, they appear as one continuous screen.
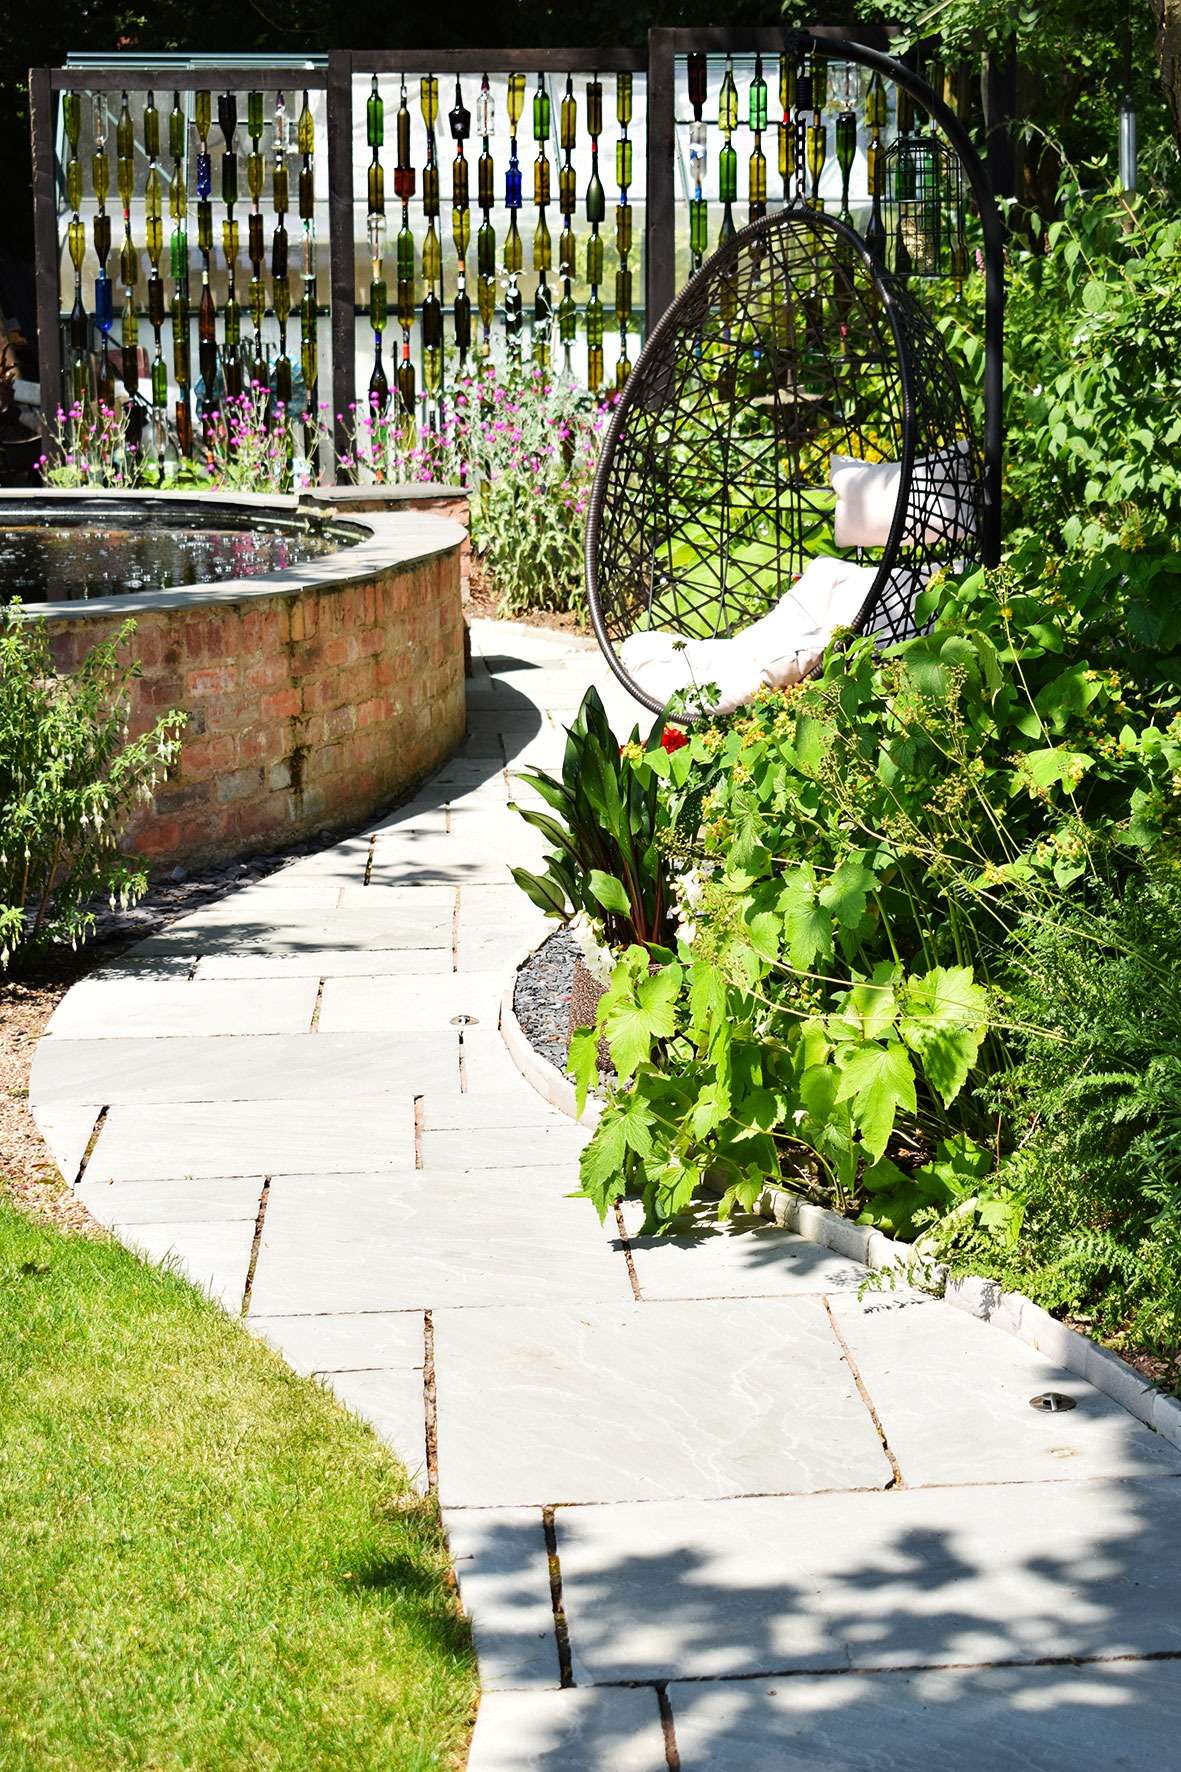
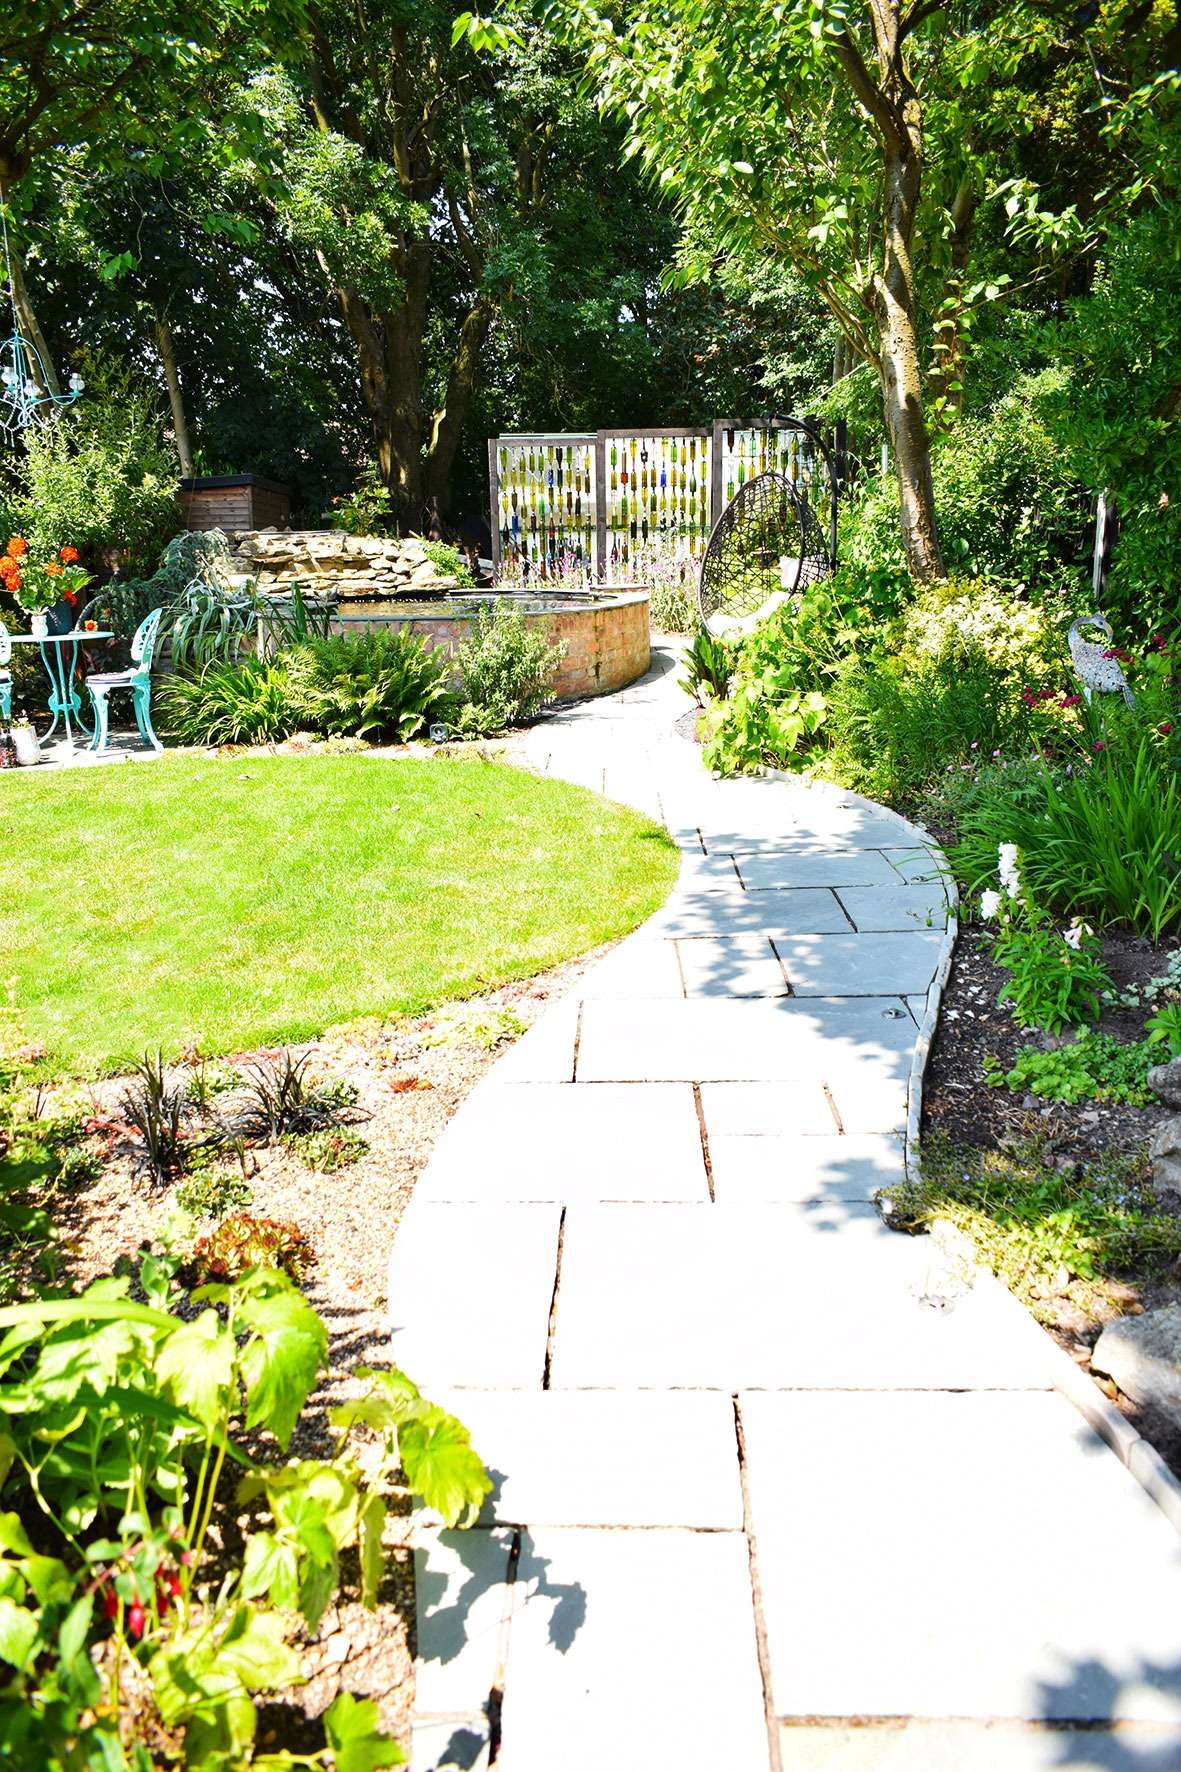
This is the view from the bottom left-hand side of the garden. The feature is a lovely backdrop for my DIY solar chandelier and painted bistro set.
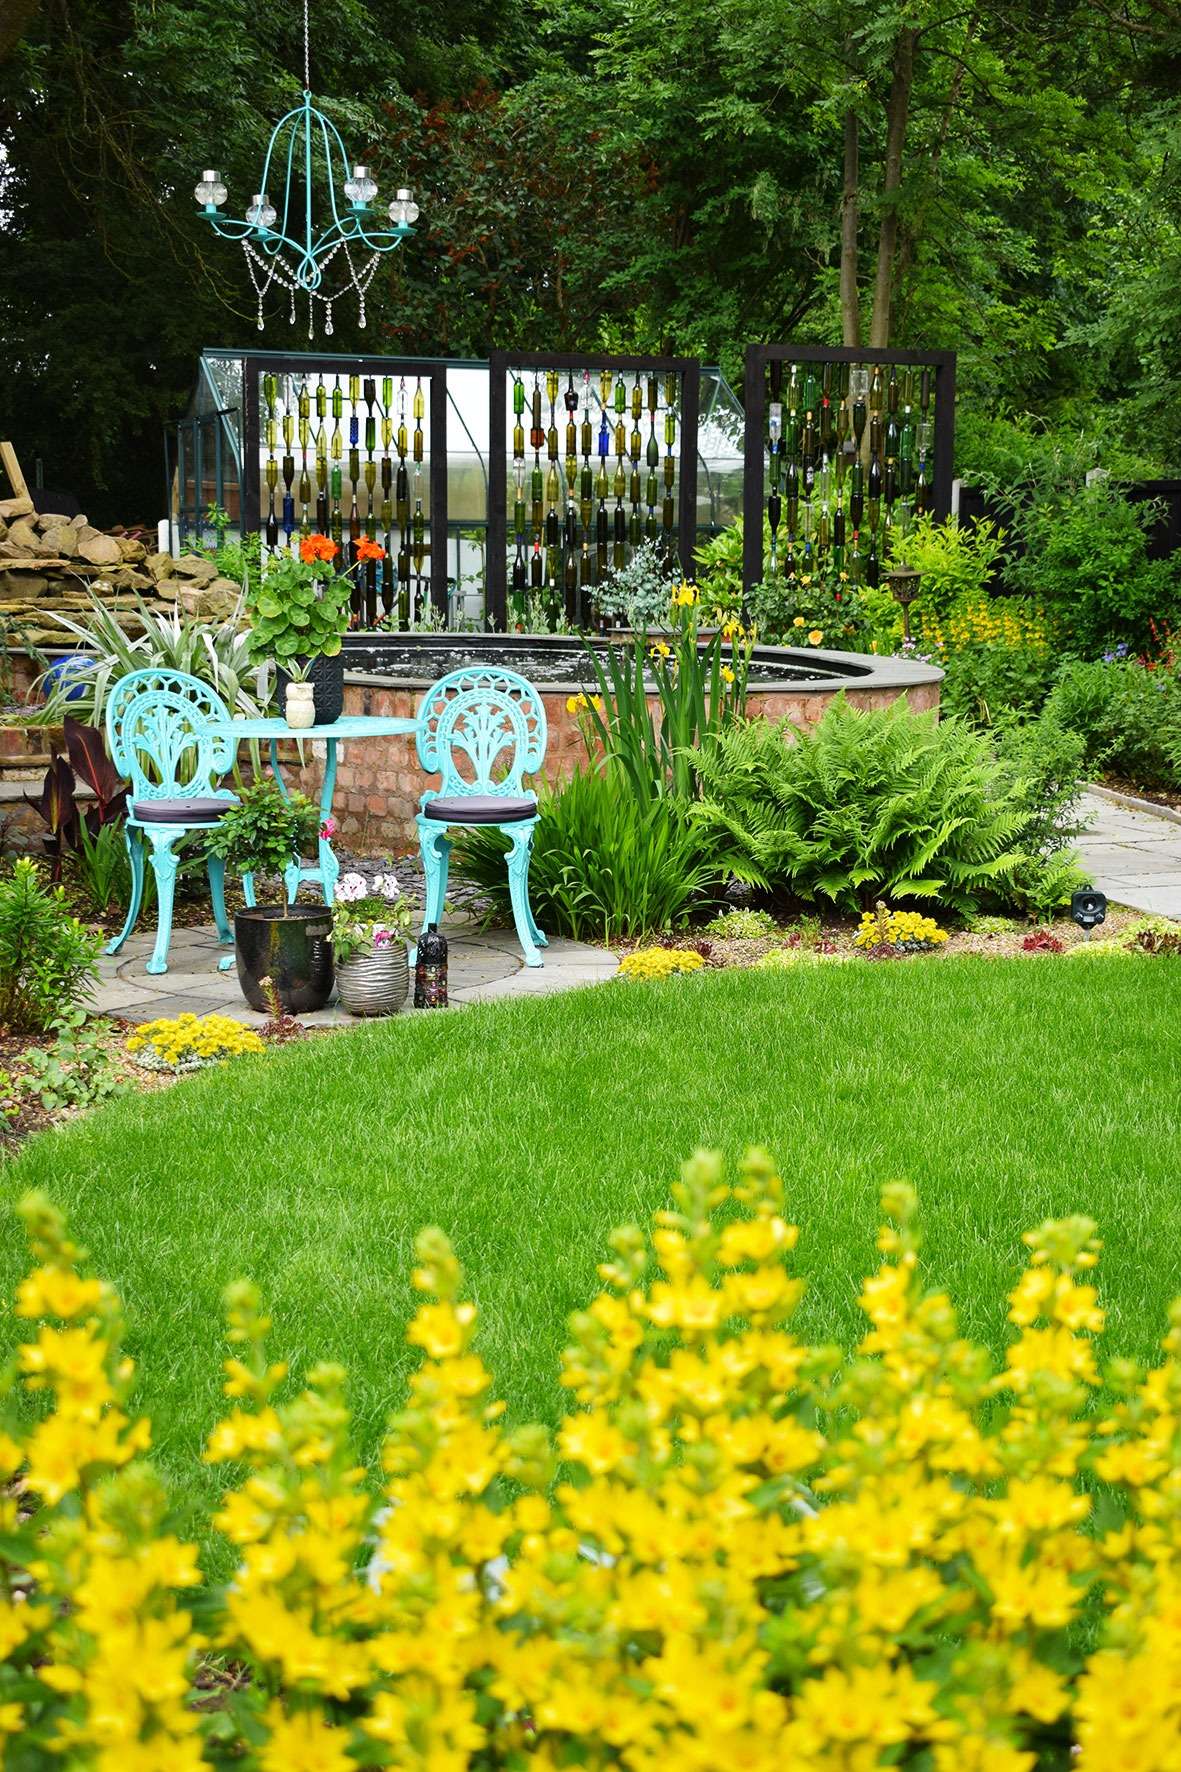
Believe it or not, beyond the greenhouse is around another 55 square metres of garden. It currently looks like a junkyard! However, we have plans for a vegetable plot, secret garden and man cave. Join my email list to keep up to date with our projects on the house and garden, plus interior design ideas, tips & DIY. All for free!


How did you work to prevent bottles cracking with ice in the winter?
This has happened occasionally. Most of them seem to drain ok as they have holes drilled through them. The bottom ones occasionally fill with water which freezes and breaks them. We just add another bottle onto the top. Hope this helps. xx
Have you ever had trouble with water settling into some of the bottles and not draining out properly…which would cause them to get moldy? Especially with most of the bottoms of bottles being concave, which does not let the water have a place to drain if the bottles are in the upright position. Thanks…I have been saving bottles and wanting to do this for a few years, but wanted to make sure this problem wouldn’t happen.
We have had no problem with mould Pamela. Please see above answer also. Good luck with your screen! Thanks Cara x
I’m a 74 yr old female who can’t get my husband involved in cutting holes in the bottom of bottles. I’d like to learn how to do it myself. Is there some place that teaches this sort of thing or do you think I could learn myself? This has been a dream of mine for several years. I’ve already saved a couple hundred bottles.
Hi Janis, As this involves power tools and glass, I would advise you to pay a tradesperson to do the job for you. Or if you have any DIY enthusiasts in your family or friend circle, maybe they would be willing to help? I hope your dream of a wine bottle screen comes true for you soon! x
Thank you for your advise. I have no problem doing this myself once I get someone to show me how. It’s just finding someone to show me.
Great, then go for it! Maybe you might find some tutorials on YouTube. Good luck with your project.
Thank you.
I’m 71 and I did it myself with a diamond bit and my husband’s drill. My friend helped hold the bottle in a bucket of sand, and would spray the bottom with water as I was drilling. I did over 100 bottles and it really didn’t take that long.
Is there a cushion between neck and bottom of bottle? Does the lip of neck fit into t bottle of bottle?
Hi Patty, no there’s no cushion, the bottles just stack on top of each other. The neck of the bottle just rests inside bottom of bottle.
Can this be done mixing liquor bottles and wine bottles?
Absolutely! Our screens do include a few liquor bottles too.
HOW FAT APART ARE THE REBAR HOLES,,,
There’s a 100mm (10cm) between each hole, from the end edge of the one hole to the start edge of the other.
Just to say how beautiful is the results and I am planning to follow up your tutorial. You did amazing job and thank you for sharing!
Aww, thank you so much Irina! So glad you like it and good look with your screens. ☺️ xx